
Do you execute numerous Arduino projects? And you need to store a huge amount of vital information and log data? The solution is to use an Arduino SD card. How does it work?
This article will take you through everything you need to know about the device, like what it is, how to connect it, how to use it, and more.
Keep reading to discover all you need to know.
Contents
What Is SD in Arduino?
An SD card or micro SD card is a device that has two major components. And these components help you include data logging to your Arduino project easily. Further, the working voltage of most micro SD cards is 3.3V.
As a result, it’s impossible to connect the device directly to 5V logic circuits. In short, if you attempt working with voltages above 3.6V, it will destroy your SD card.
Hence, that’s why a module features a regulator (onboard ultra-low dropout) that changes current voltage from 3.3 – 6V to approximately 3.3V.
In addition, the SD card has a chip on the module (74LVC125A), which helps to change the connecting logic from 3.3 – 5V to 3.3V. So, you can refer to the process as “logic level shifting,” meaning the board can link with two microcontrollers like Arduino: 3.3V and 5V.
Components of microcontrollers
How do you interface a standard SD card with Arduino? We have two methods for this: SDIO mode and SPI mode.
Most SD card modules are based on SPI mode (less overhead & lower speed). And this is an easy mode for most microcontrollers to use.
Memory card modules
On the other hand, the faster mode is SDIO, and it applies to different devices like mobile phones, cameras, etc. But this mode tends to be more complex as you need to sign confidential documents before proceeding.
The Pinout of the Arduino SD Card Module
The SD card module features six pins on the adapter, and they include the following:
- MOSI – SPI input
- CS – signal pin for Chip select to disable/enable line
- GND – Ground pin
- MISO – SPI output
- VCC – +5V power supply
- SCK – It receives clock impulses to synchronize data
How to Prepare Your Micro SD Card
First, you need to get an SD card module and insert your micro SD card. Then, place the module in the Arduino to format the card properly.
While you’re at it, ensure that you format the card based on the Arduino library. That is, you should format the memory card to FAT32 or FAT16.
Also, if you’re working with a brand new SD card, the manufacturers may have pre-formatted it with a FAT file system. But you may encounter issues with the card’s format. So, the rule of thumb is to reformat your SD card, whether it’s new or old.
How Do You Connect the SD Card to Arduino?
Since your SD card is ready for use, you can connect it to the SD breakout board.
So, you can start by placing the micro SD card module on your breadboard. Then, connect the module’s VCC pin to the Arduino’s 5V. Also, link the GND pin to the ground. And what would be left are the pins for SPI communication.
Typically, micro SD cards need a lot of data transfer. But they perform better when you connect the cards to the microcontroller’s hardware SPI pins. And it’s because the pins (SPI) are faster than “bit-banging” the interface code with a different set of pins.
Further, it’s vital to note that Arduino boards have various SPI pins that you have to connect accordingly. For instance, the Arduino Nano has pins like 11 (MOSI), 12 (MISO), and 13 (SCK). Additionally, you need a fourth pin: the SS line “chip select.”
In addition, you can use pin 10 for the SS pin or any preferred one. However, when dealing with Arduino mega, the pins are different. So, you have to use 53 (SS), 50 (MISO), 51 (MOSI), and 52 (SCK). Also, you can refer to this official documentation if you’re using other Arduino boards. Then, you’re ready to log data.

How Do You Use an Arduino Code to Test the SD Card Module with CardInfo?
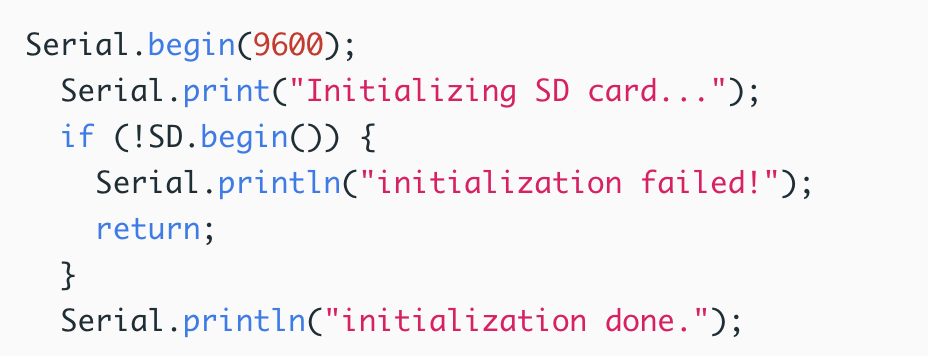
It can be tedious to communicate with an SD card. But the good part is that the Arduino IDE features a nice library “SD.” As a result, it eases the process of reading and writing SD cards.
Further, run the sketch and click File→Examples→SD→card info. Afterward, the sketch will notify you if it recognizes your SD card by showing some data. Then, you can go back to sketch and confirm that the “chip Select” is using the correct digital pin. If not, change the pin to 10.
Once everything looks good, place the SD card into the module and upload the sketch. Further, you should see a prompt immediately when you open the Serial Monitor. And the prompt should show FAT32 for the volume type, the size, and SDHC (SD High Capacity) as the card type.
But if it’s a clone or bad SD card, you might see SD1 as the card type with no product and manufacturer ID. With this, you can try reformatting the card. If you get the same result, toss the card.
Lastly, rerun the sketch without your SD card. And the sketch won’t initialize the SD card. Interestingly, you can also get this prompt if your card is damaged or has a wiring error.
What if the SD card is properly formatted with correct wiring? The prompt will read: “wiring is correct, and a card is present.”
Reading and Writing Data With an Arduino SD Card
If your SD card has initialized successfully, you can proceed to the next step. First, you can start by uploading the code on the sketch. So, if everything is good, you’ll see a display that reads “initialization done.”
Also, you’ll see “writing to test done.” Hence, if you choose to reset the Arduino and allow the sketch to run again, the previous data will not overwrite. Instead, the new data will attach to the previous data.
What Does the Code Mean?
Part 1
The sketch has the SPI library and built-in SD library. As a result, you can easily use your SD card to contact the SPI interface.

Then, you have to choose the Arduino pin that the CS will connect to the module’s pin. And that’s because the CS pin is not fixed. In addition, since you’re using the hardware SPI library, there’s no need to state the pins because they are fixed.
Next, you have to create an object, myFile, that helps you store information on your SD card.

Then, head to the setup()section to begin serial communication for displaying results on the serial monitor.
Afterward, you’ll need the SD.begin() function to initialize your card. So, if your card initialization sails through, the “if” statement will be true, and the String “initialization done” appears on the serial monitor. Otherwise, the “else String”: “initialization failed” will appear, and the program will end.
Then, you’ll see the SD.open() function open a file: “test.txt.” If you don’t see this file, you have to create one. As a result, the FILE_WRITE function will open in read-write mode.

Once the file opens, the serial monitor will display a “Writing to test.txt..” message. Further, you’ll see “testing 1, 2, 3” at the myFile.println() function. Afterward, you’ll need to apply the close() function to save the data written to the file.
Part 2
Now, you have to check the file to confirm the write operation was successful. And you can do this by using the SD.open() function as “test.txt.” Later, you can use the myFile.read() function, which will read from the file and display it on the serial monitor.
After, use the “while” loop and myFile.available() function to read the file characters. And it’s because the read() function reads one character per time. Then, close the file.

There won’t be a need to run the codes multiple times because this is a demo sketch. And all the codes are in the setup() function that runs once.

Important Things to Note
1. There’s no case sensitivity in the file names. So, WriteLog.Txt is the same thing as writelog.txt and WRITELOG.TXT.
2. It’s possible to open your files in a directory.
3. You can write variables, strings, etc., with the println() and print() function.
4. The Read() function doesn’t read a full number or line. Instead, it returns one character at a time.
5. It’s crucial to keep file names short as the SD card library doesn’t support “long filenames.”
FAQs
What is the Arduino SD card max size?
The maximum SD card is 2GB.
Can an Arduino SD card be corrupt?
Yes, it’s possible. And it could happen due to physical damage, improper use, manufacturing defects, and malware.
Bottom Line
The Arduino SD card is a practical storage device that you can use to log data. And it’s quite easy to set up as long as you wire accurately. Also, you can read and write data conveniently with this device.
Do you need help getting the best Arduino SD cards for your projects? Feel free to reach out.


