Does your project involve precise and accurate location data, and you’re confused about where to start? It would help if you had a GPS module.
With a basic GPS module, you can get all the location data you need for your project.
Although working with GPS can be tricky, it’s more straightforward than complicated–thanks to the efforts of several individuals and industries.
You may also confuse about what GPS modules work best for your application or sourcing the right parts.
In this article, you’ll see solutions to your GPS-related problems and learn everything you need about the GPS circuit.
Contents
What is a GPS Module?
When it comes to location data, the first thing that comes to mind is GPS. But what exactly is a GPS?
The Global Positioning System (GPS) is a radio navigation system that determines precise and accurate location, velocity, and time regardless of weather conditions. Additionally, GPS works on land, air, and sea.
GPS modules are devices that allow your devices or circuits to receive GPS data. But if GPS modules aren’t available, you can use microcontrollers as alternatives with a simple code.
Nowadays, GPS settings are standard on phones, computers, and other intelligent devices that allow you to share your location or track the location of another object or person. Also, GPS gives you access to real-time maps and offers navigation systems.
How Does GPS Work?
The GPS satellites and receivers are the two major components that make GPS function possible. Also, the device always has four active satellites in the receiver’s transmission range.
Each GPS satellite sends data to the receiver about its current time and location. Then, the satellite transmits this data into radio signals the GPS receiver intercepts.
Interestingly, these radio signals travel at light speeds making the transmission fast enough for real-time data applications. Plus, you can calculate the distance between a satellite and a GPS receiver by noting the difference between when the satellite sent the signal and when the receiver intercepted it.
When the receiver collects these signals from more than three satellites, it determines its location via the trilateration process. However, a GPS receiver needs a minimum of three GPS satellites to deliver location data.
Interestingly, most GPS modules work the same way. They use a standard serial interface for communications with the options of SPI and I2C communication interfaces.
Additionally, the format for messaging also has its standards. GPS modules usually output data using the NMEA-0183 form.
Alternatively, you can use codes for microcontroller platforms that will turn your board into a working GPS module. Some of these projects include Adafruit GPS, minima, and NeoGPS. Projects like these will use a serial data stream to provide all the location data you want.

GPS Modules with Arduino and Raspberry Pi
For this project, we’ll use the NEP-6M GPS module. This module comes with an external antenna but doesn’t feature header pins. Hence, you’ll need to solder header pins to your module if you need to use them.
The NEP-6M module works with both Arduino and Raspberry Pi microcontroller boards. To do this, you’ll need the following components:
- Arduino kit
- Jumper wires
- NEO-6M GPS module
Wiring GPS Module with Arduino
The NEO-6M GPS module has four pins: RX, GND, VCC, and T.
Serial communication is the primary communication method with Arduino. Also, the TX and RX serve as serial pins.
Here’s how to wire the Arduino to your GPS module:
- Connect the GND pin of the GPS module to the Arduino’s GND pin
- Next, link the RX pin of the module to the Arduino’s pin 3
- Then join the TX pin to pin 4 of the Arduino.
- Finally, connect the VCC pin to the 5v pin of the Arduino.
Code
After connecting your module to Arduino, upload the following code to your Arduino UNO:
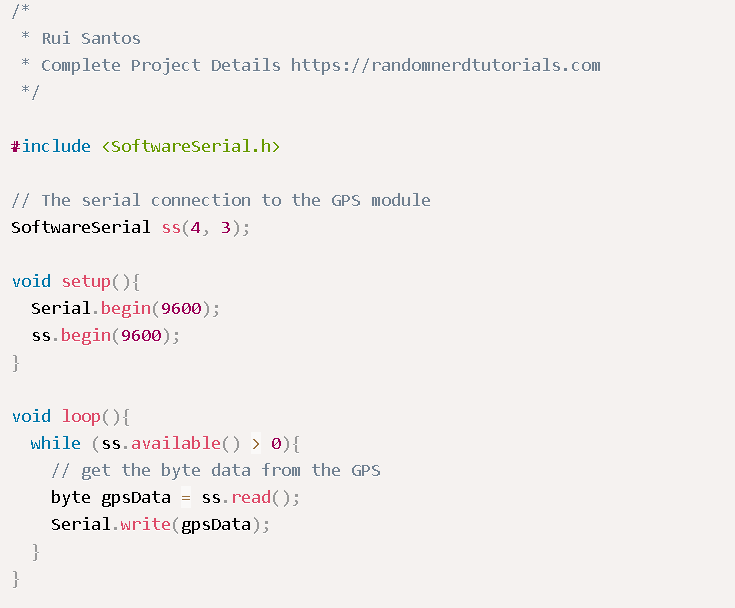
While at it, ensure you edit the code according to your GPS module’s features.
GPS Module with Raspberry Pi
To get location data, you can use the U-Blox NEO-M8N GPS module with a Raspberry Pi. But you need some experience with python before installing Raspbian OS. Also, you’ll need a python code to connect the Pi board to the GPS module.
That said, here’s what you need for this project:
- Raspberry Pi board
- Power supply (for Raspberry Pi)
- Breadboard
- MicroSD card, preferably 8GB
- Jumper wires
- GPS module (U-Blox NEO-M8N GPS module)
How to Build
First, you need to enable UART communication on your Raspberry Pi. Then, use the following code to begin the process:

- Next, add the following lines at the end of the file:

- Then, to leave the file, click “ctrl+x,” or you can save by clicking “y and enter.”
Note: UART is a serial console for the Raspian OS. Hence, you can disable that function. Also,
you can make modifications for the “/boot/cmdline.txt file.” But before modifying anything, create a backup with the following code:

- Next, reinstate the text file with the following lines:

- Then, to close the file, click “Ctrl+X.” While you’re at it, you can save your modifications by clicking “Y” and “Enter.”
- Finally, use the following code to reboot the Pi and see your modifications:

Use the GPS module’s LED to check if it works. If the LED (yellow) blinks, the GPS module is working. So you can proceed to run the following command:

Deactivate Serial Getty Service of Raspberry Pi
If ttyAMA0 works with Serial0 for your output, then use the following commands to deactivate it:

Alternatively, if you link your creation “Serial0” and “ttys0,” then use the following commands to disable it:

Then, reboot your system with the reboot command.
Activate ttys0
After deactivating the ttyAMA0, use the following command to enable your ttys0:

The “Pynmea2” and “Minicom” Installation
Install the “minicom” python package to link the GPS module. Afterward, you can understand the data below:

Also, install the pynmea2 Python mode to run the NMEA data you receive:

Test Your Circuit Output
Finally, test the output of your GPS with the following command:

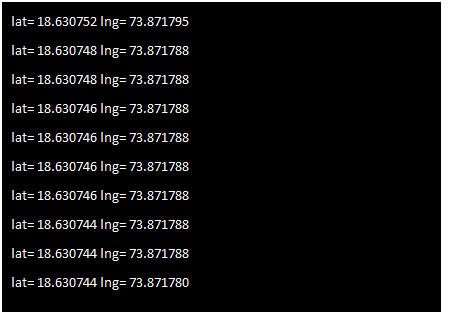
The results should look like this:
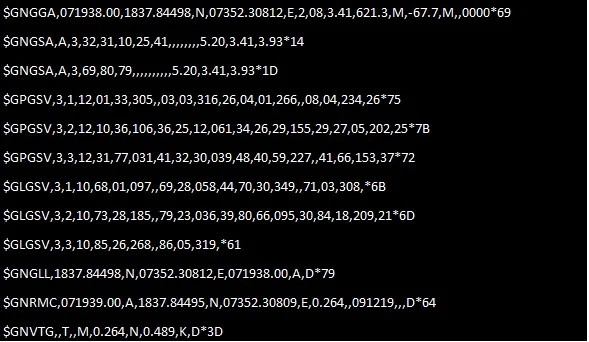
GPS Results
Then, log the python code so you can interface the Raspberry Pi with the GPS module:
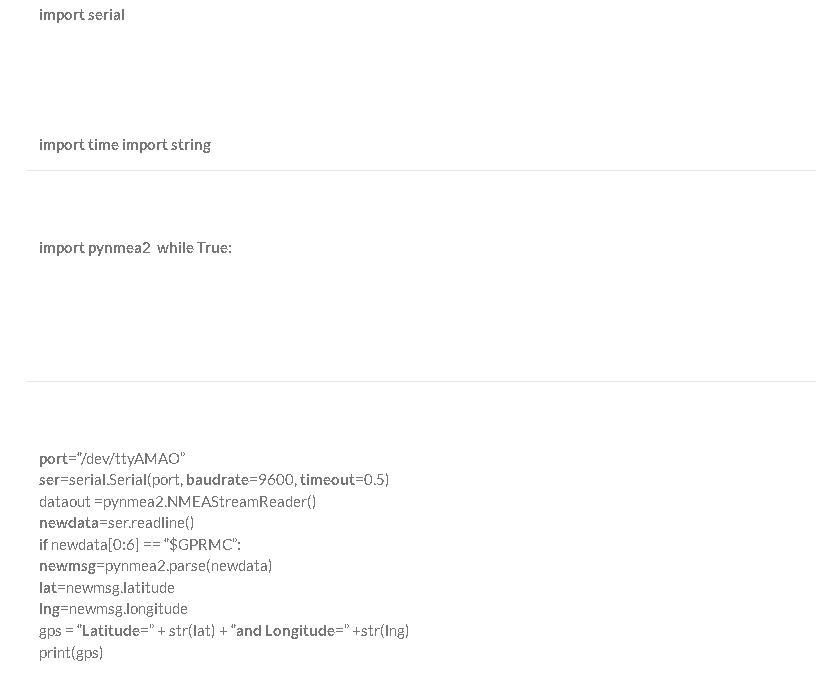
Your final results should look like this:
GPS Final Results
How to Choose the Right GPS Module for your Project
As mentioned earlier, almost all GPS modules work the same way. But the type of GPS module you use should depend on your application.
You might need different things from your GPS navigation module. For instance, if you’re working with fast-moving platforms that use GPS for autopiloting, you’d need a GPS module with a fast update rate.
A basic GPS module will suffice if you require accuracy down to a few meters at a low update rate.
Also, a module with an external GPS antenna is ideal if you need constant signals. But if accuracy is everything you need, using modules with Real-Time Kinetics technology is the perfect go-to.
Final Words
With GPS modules, you can get location data with speed and accuracy. Though there are no visible satellites, GPS satellites orbit the earth to provide constant accuracy.
In addition, data transmission between a GPS satellite and a receiver also happens at light speed. So, it’s fast and dependable for your projects and applications.
If you have any questions, contact us, and we’ll be happy to help.


