Raspberry Pi
Are you finding it tricky and complex to build a Raspberry Pi robot? Then you’re in the right place.
Indeed, using a Pi board for your robot would give you a complete computer at an affordable price. Hence, combining this with its small form factor and extensive community support will be a great board, even for beginners.
However, diving into robotics means diving into more advanced circuit designs. But don’t worry, we’ll make it as easy as possible. https://www.wellpcb.com/
So, in this article, we’ll cover how to build a Raspberry Pi robot and the different Pi robot projects you can make.
How to Build a Raspberry Pi Robot
Here, we’ll show you how to build a beginner-friendly Pi robot that can avoid obstacles and freely navigate. Here are the parts you need for this project:
- Raspberry Pi (B, B+, or 2 models)
- Geared DC motors (1)
- Caster wheel (1)
- Sd card (1)
- Mouse (1)
- Push Button (1)
- Mouse (1)
- 200R resistor (1)
- Breadboard (1)
- Double-sided tape (1)
- Keyboard
- L293D driver (1)
- Male to male or female to female jumpers (1)
- Robot chassis and wheels (1)
- IR sensor modules (1)
Building the Project
First, we have to connect the IR sensor to the Raspberry Pi. So, to do this, put on your Raspberry Pi after connecting it to your keyboard, mouse, and monitor. Next, click your sensor and make sure it’s working correctly.
Afterward, connect the Pi’s 5V pin and GND pin to the sensor for the power supply. Next, click the sensor’s B pin to the GPIO pins 16 and 3. Finally, check the pin configuration of the GPIO.BOARD.
Next, input the following code and save it as a Python file, preferably irtest.py.
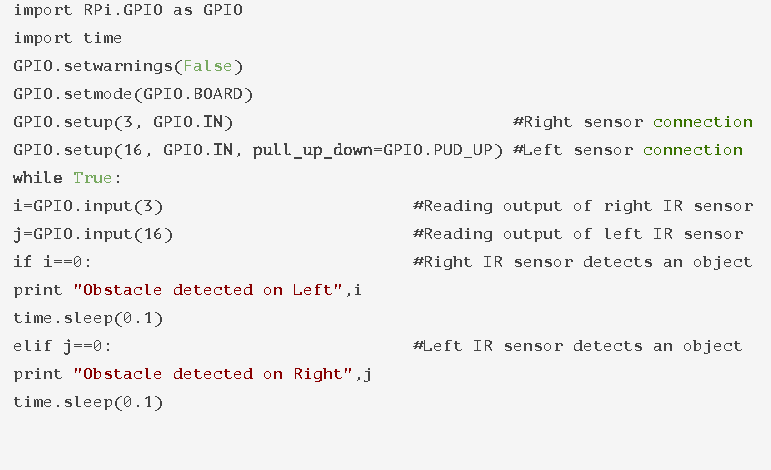
Code for Python File
Once you save and run the python file, you’ll notice the following output prints when you block the sensor:
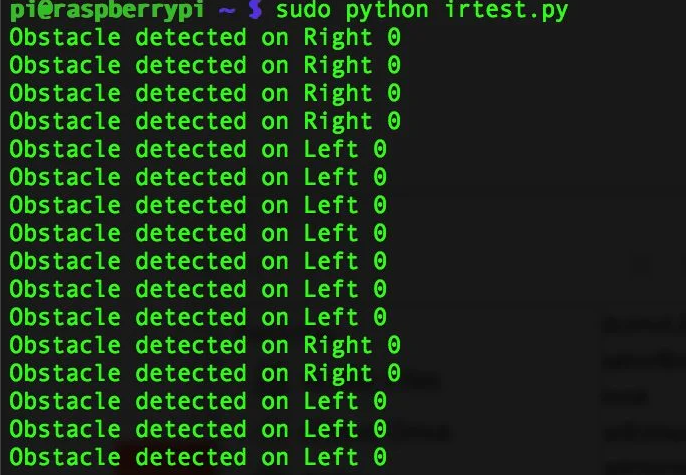
Output Prints for Python File
So, try checking your connections or replacing your components if it doesn’t work.
Connect your Motors with the L293D
Now, we’ll use the L293D module to connect the motors. But, first, supply power to the L293D via + and – pins. Then, combine these power supply pins to the 9v battery board.
Full Circuit Connection
In addition, connect the – pin of L293D to the Pi’s GND pin. Check out the diagram below to get a clear picture of the connections.
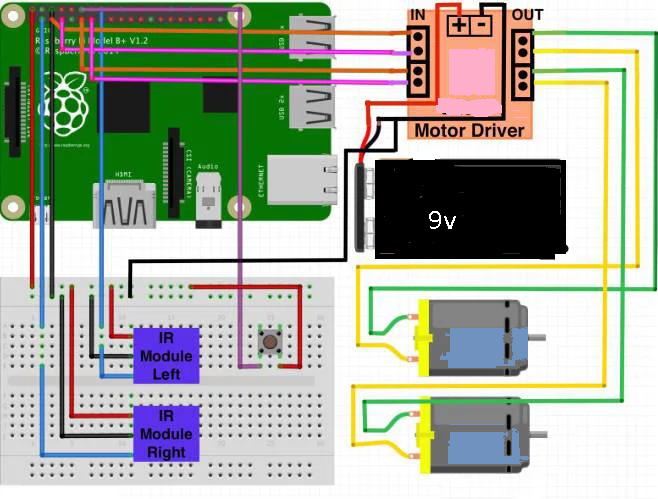
Furthermore, use four output GPIO pins to create inputs for the board. Plus, you can use these output pins to control which direction the two motors will rotate.
Also, you can connect the two motor terminals to the board’s four output terminals. Finally, attach a push-button for activating or deactivating your robot for your last connection.
Final Construction
Now you can add wheels to your motors and assemble your connections on your robot chassis. Ensure you secure the parts with your double-sided tape to avoid falling off.
Don’t forget to test your motors with the code below. Also, ensure you save the code as a python file: moto.py. Then use the sudo motor.py command to run the code. Your motors should start rotating if it works.
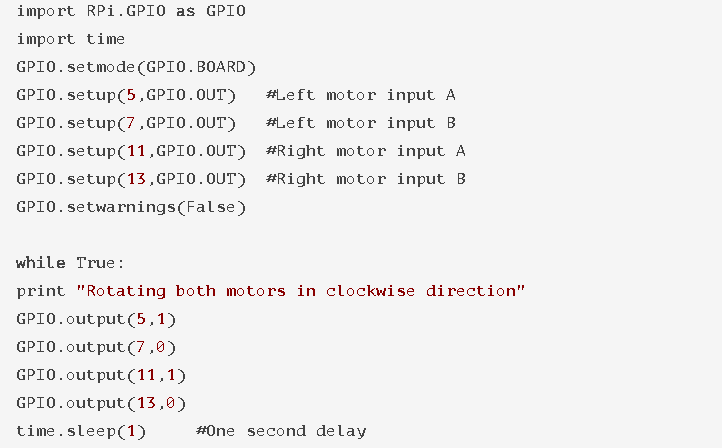
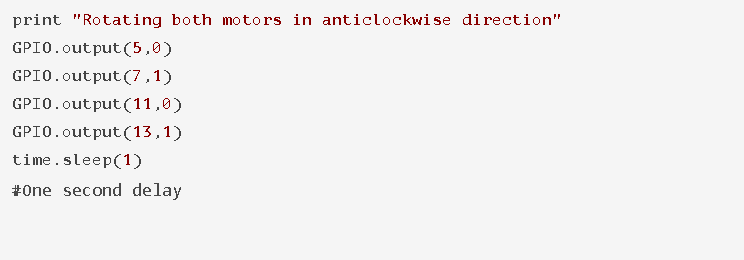
Code for Testing Motors
How it Works
The robot will activate and start moving when you press the push button. While moving forward, the robot will search for any objects blocking its path with the IR sensor. Once it detects an obstacle, the Pi will allow the robot to maneuver around the obstacle. Again, you can deactivate the robot by pushing the button.

Raspberry Pi Robot Projects
So, if you’ve completed the easy project above and you’re looking for more challenges, here are some excellent project ideas to try.
1. CHOP Quadruped Robot
Indeed, the chop quadruped robot is a DIY project similar to the Boston Dynamics spot. Additionally, the CHOP project is open-source. Hence, you can customize and adjust it with a few 3D-printed parts and other materials.
The Raspberry Pi 4B and an Arduino Mega are the significant components of this robot. Also, the Arduino filters data from sensors and connects to the servo controllers. On the other hand, the Pi collects all the data and runs various Python scripts to control the robot’s movement.
Additionally, the Pi uses an inverse kinematic model to control how the servos move. Lastly, you can use a Bluetooth controller to control the robot’s direction.
2. Ping Pong Robot
The ping pong robot is capable of playing table tennis with humans. And on different levels, from advanced to simple.
You use the ping pong bot for leisure gaming or severe practice. However, you could purchase a commercial version for about two thousand dollars. Or, effortlessly make a DIY version with parts you already have, 3D printed and laser-cut parts.
Plus, you can connect to the bot through WiFi and have complete control.
3. Raspberry Pi Humanoid Robot
You can build your humanoid robot using a Raspberry Pi. Some humanoid robots have obstacle avoidance, ultrasonic distance sensing, or wireless control features.
Regardless of the feature, you’ll need a Robotics Bioloid kit, gyroscope, and distance sensor for this project.
We recommend using the smaller Raspberry Pi Zero and a single-cell 2500 Mah battery for the power supply.
Plus, you’ll need an analog-to-digital converter chip to read the sensor’s data.
4. Pi Roomba
If you’re experienced in robotics, then you’ve probably heard of a Roomba robot vacuum cleaner.
However, you can build yours with a Raspberry Pi and more intelligent movements.
You’ll need a Roomba 530 serial interface to connect to your Raspberry Pi.
Additionally, you’ll be using a Javascript package for the coding. The box also uses an RxTX to communicate with the robot.
Also, you can control the Roomba with a joystick and even set your level output.
5. Butter Robot
The intelligent butter robot can record and stream videos with excellent quality. Plus, it can record and output audio.
The best part is you only need a Raspberry Pi camera module and a USB device to capture these sounds and videos.
However, the components of the robot include:
- Raspberry Pi Zero W
- RPi camera module
- DC motors
- USB audio board
- L9110 motor driver
- Led
- Battery pack
- 9g servos
- Slide switch
- Speaker
Also, you can use this robot through the Blynk app, which supports video streaming.
6. Petoi Robotic Cat
You can build a lovable robotic cat with the Nybble open-source mechanical cat project. Plus, you can use laser-cut wooden parts instead of 3D-printed parts.
Other components for this project include a Raspberry Pi 3B+, the Nybble kit, and a Sparkfun Arduino Pro Mini.
Plus, you can control the movement of this robot with an Arduino-compatible microcontroller. The robotic cat can also store muscle memory, which allows it to remember how to move.
Furthermore, the Raspberry Pi in this project allows you to adjust the Nybble code and give simple commands.
7. Spot Micro
The spot micro is a smaller version of the popular Spot quadruple robot. Plus, you can get a trot and walk gait with three-axis “angle command control modes.”
The robot runs on a Raspberry Pi 3B with Ubuntu. Also, it uses a C++ and Python framework.
Additionally, you’ll need the following components of your want to attempt this project:
- Raspberry Pi 3 B
- 15×2 LCD panel
- PCA9685 servo board
- 4000 mah battery
- 5v voltage regulator
- 3D printed parts
- Lider (optional for room mapping)
8. Miniature Fighting Robot
Do you want to build a powerful fighting robot? Then you can try this project. Using the Raspberry Pi Zero, you can translate inputs from a Bluetooth controller into commands for your robot’s motor controllers.
Instead of using an RC transmitter, the project uses a more straightforward GPIO pin configuration.
It would help if you had an L298N board for locomotion, a Tarot TL300G ESC for spinning the brushless motors, and a 500Mah battery pack. And you have yourself a mini fighting robot on a 3D-printed chassis.
9. Raspberry Pi Devastator Robot
As the name implies, you can build a robotic tank with a Raspberry Pi Zero W. The build includes a 3D printed custom bracket, some python code, and a motor controller circuit. You can also add a mounted camera.
Alternatively, you can find everything you need for this project on the Devastator Tank mobile platform.
Final Words
The Raspberry Pi is a versatile mini-computer that works for various applications. Most of the Raspberry Pi robot projects we listed in this article use only beginner-friendly Python.
Also, if you can’t find all the components necessary for a project, you can try robotic kits. Purchasing automatic equipment would give you ready-made details for your robot project.
However, you’ll need a basic or intermediate skillset to attempt any of these projects.
Do you have any questions? Feel free to contact us, and we’ll be happy to help.


