
Contents
What is an RPI Weather Station?
An RPI weather station is a technology that allows you to monitor the environment and weather conditions. Hence, you can watch the humidity and air quality and even tell the temperature right in your neighborhood.
Moreover, the RPI weather station is only possible with a Raspberry PI kit, which comes with the sensors needed to measure weather events accurately.
In addition, weather stations are essential in areas with changeable conditions and monitoring the environment before stepping out.
There are different ways to build an RPI weather station. Some run on solar energy, while others need a Sense HAT. But we’ll focus on the more straightforward project.

How to Build an RPI Weather Station
Although you could always check your phone for the weather, this project is the perfect system to become familiar with web host systems, Sense HATs, and even python scripts. Also, we won’t use a Raspberry PI kit with built-in sensors. Instead, we’ll use a Sense HAT to add the sensors we need. Luckily, it’s nothing too complicated.
Plus, the Sense HAT allows you to sense humidity and temperature. You can display the information with a Python script on your monitor or the grid’s Sense HAT LED.
Now, before we begin this project, here are the components you’ll need:
- Sense HAT
- HDMI cable
- Monitor or TV

Monitor
- Raspberry PI and 40 GPIO pins (It runs Raspbian)
- MicroSD card and Raspbian disk image
Once you have all your components, it’s time to start building!
Steps
Before we begin, there are different ways to display weather information, but they all start by getting the measurements with a Sense HAT.
Hence, we’ll use the Sense HAT to collect data. Then, we’ll check it by displaying the information in our Raspbian Terminal.
Now that’s out of the way, here are the steps you need to follow for this project:
Step 1: Connecting Sense HAT to Raspberry PI
First, you’ll need to connect the Sense HAT to a PI chip. To begin, unplug and turn off your Raspberry PI so you don’t get electrocuted.
Again, the Sense HAT uses the RPI’s GPIO pin to receive and send information. Thus, slide the GIPO slots of your Sense HAT above the GPIO pins.
Also, you can use the GPIO breakout kit to create some distance between Sense HAT and your RPI’s CPU. Why? The Sense HAT gets warm so that it can mess with your readings. Plus, if you have a heat sink, you can use it.
After making the proper attachments, you can plug in and turn on the Raspberry Pi. Something is wrong if you don’t see a rainbow-colored pattern on your array’s Sense HAT LED. Hence, ensure to check if you made the right connections. Otherwise, consider replacing your components.
Step 2: Check For Updates
If you’ve handled a few Raspberry Pi projects, you’d know it’s best to check for any updates before starting. Hence, to check for updates, open the terminal application in your Raspian disk image and input the following commands:
sudo apt-get update
sudo apt-get upgrade
After running updates, check if the Sense HAT package is present. Though Raspbian has the package included, double-check again.
Thus, use the code below:
sudo apt-get install sense-hat
Step 3: Scripting
It’s time to produce a script enabling the Sense HAT to sense humidity and temperature. Open your Raspbian terminal and use a text editor to start writing your hand to create a new file.
You can also use the nano text editor ready with the Raspbian package.
Thus, input the following command to get this done:
nano weatherstation.py
The command instructs nano to form or open the file if it exists. Once it’s open, here’s the script you’ll need to write:
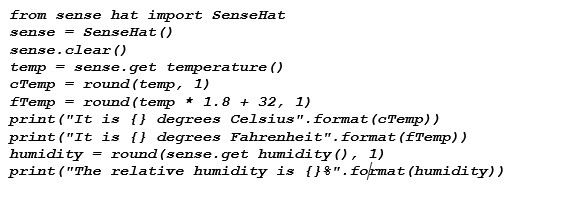
Python Script
After running the script, close the nan. Then, save your work with ctrl+X, Y, and enter. Then, use the command below to run the script:
sudo python weatherstation.py
Here’s what your results should look like:
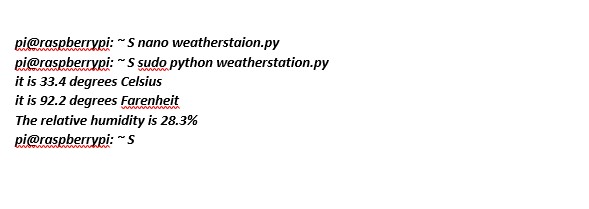
Python Script Results
Note: if your readings are too warm, it could be the heat generated from the Raspberry Pi. You can also install a heat sink on your PI CPU to quickly solve this issue.
Displaying Information On Your Sense HAT Array
The Sense HAT is not only beneficial for its sensors, but you can also enjoy displaying your weather information on a grid of LEDs.
Here’s how to display your weather information on an LED array instead of a monitor:
New Script
Now, you have two options for this part of the project: edit your old code or create a new one. If you’re making a new one, input the following command to create a new script file:
nano LEDweather.py
Once it’s open, here’s the script you’ll be writing:
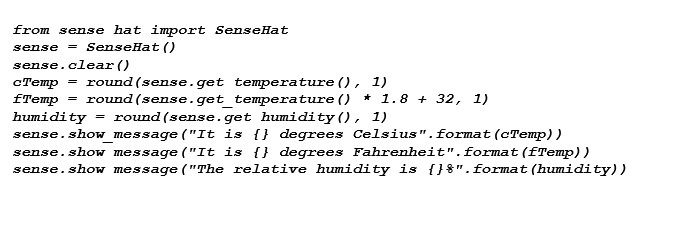
New Script
When you run the script with the following command, you should see the weather information displayed on the LED screen of your Sense HAT.
Additionally, this new script works like the one for displaying your weather information on a monitor. Plus, the major differences are the cleaning of the variable temp command and the addition of the following lines:
sense.show_message(“It is {} degrees Celsius”.format(cTemp))
sense.show_message(“It is {} degrees Fahrenheit”.format(fTemp))
sense.show_message(“The relative humidity is {}%”.format(humidity))
Alternatively, if you’re editing the script for the monitor, run the script with the nano command and update the script to switch your display to the Sense HAT LED display.
If you’re up to it, you could even learn how to switch your display to your website. The process requires you to create another python script and build a web page with basic HTML.
Final Thoughts
Feels excellent to build your RPI weather station, right? We know that feeling. What’s even better is by completing this project, you’ll get used to writing scripts in Python and learning how to use a Sense HAT with a Raspberry Pi.
However, if you don’t get it on your first try, don’t worry. It may not be easy at first, but with continuous practice, you could even create your own weather scripts.
If you’re up for more challenges, check other ways to build a weather station with a Raspberry Pi.
Got any questions? Let us know by reaching out to us. We’ll be glad to help you out.


