Do you need a flexible network model structure that’s less complex than Bluetooth and has a long battery life? Alternatively, are you looking for a destination device that supports many nodes with easy installation? Then, it would help if you had a Zig bee module.
How does it work? This article will give you a comprehensive breakdown of the device. So, you’ll learn what it is, the protocol, how the wireless module works, etc.
Let’s get started!
Contents
- 1 What Is a Zigbee Module?
- 2 What Should You Know About a Zigbee Module USB?
- 3 What Makes the Zigbee Protocol Unique?
- 4 How To Connect Zigbee Module With Arduino
- 5 How to Interface ZigBee Module to Raspberry Pi
- 6 Applications of Zigbee Module
- 7 Zigbee module Projects: How to create a Zigbee bridge
- 8 FAQs
- 9 Final Words
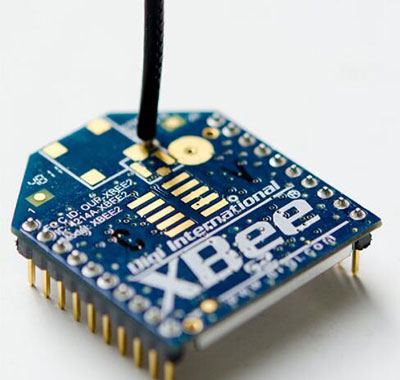
What Is a Zigbee Module?
Since Zigbee modules are for shallow data IoT-bound devices, the low mesh wireless transmitters run on IEEE 802.15.4 Zigbee systems. This wireless module utilizes underhand frequency bands like 2.4GHz, 900 MHz, and 868 MHz. Plus, it’s suitable for battery-operated devices.
But that’s not all. You can connect up to 65,000 nodes in a network. And it works perfectly well with DSSS (Direct Sequence Spread Spectrum Modulation).
Thanks to its low latency, this protocol runs 128-bits AES encryption.
Since its launch at the beginning of the new millennium, it has gotten several updates. So, Zigbee 3.0 is the latest version of the Zigbee module.
What Should You Know About a Zigbee Module USB?
The Zigbee module USB shares many similarities with the regular USB single utilized for storing a set of information or data. But that’s not all.
This unique USB dongle can easily handshake other Zigbee appliances around it, sending a stream of information via the wireless Zigbee connection.
Also, it works with a stable 2.4GHz band (ISM). And the Zigbee USB module has a WPAN standard of IEEE 802. This USB dongle also uses an RF transceiver module to run DSSS modulations.
The Zigbee USB dongle doubles as network sensor/coordinator and router device. In other words, you can easily add it to a Zigbee network system.
What Makes the Zigbee Protocol Unique?
The protocol layers of Zigbee are in alliance with the OSI (open system interconnect) and ISO (international standard organization) reference models. Zigbee only executes strictly low data and low output power Wireless network systems out of the seven layers provided by OSI and ISO.
Of course, MAC and PHY are the low ISO and OSI layers that work perfectly with Zigbee protocols, which run on IEEE 802.15.4. Plus, there are unique security features embedded in these two layers.
Below is a standard system that executes all the layers of a Zigbee network model mesh:
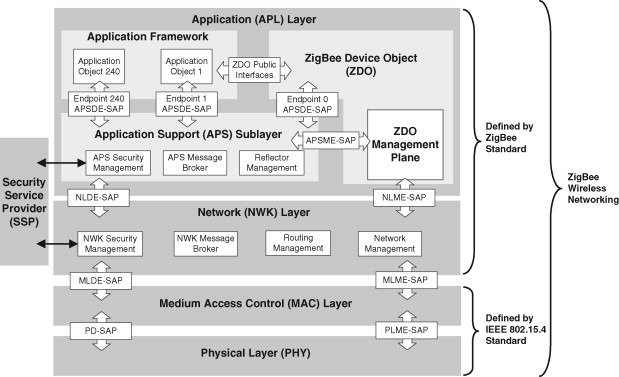
Zigbee Network Mesh
Image source: Sciencedirect
How To Connect Zigbee Module With Arduino
The best way to interface your Zigbee module with an Arduino is by first identifying the series of Zigbee you’re using. We’ll use a series one Zigbee module for this article because it’s the most preferred option for newbies.
First off, you need to realize that you can get Zigbee modules to handshake each other if they are of the same model.
Steps
So, to connect two similar Zigbee models to an Arduino, follow these steps:
Step 1
Join the first module to the Arduino board and the second one to a PC, microcontroller, or sensor. After doing this, configure both Zigbee modules.
Here are the steps required to configure Zigbee modules:
- First, use a serial adapter to join the two Zigbee modules to a PC serial port.
- Next, download the PuTTy application if you use Windows OS or get a virtual terminal.
- Afterward, confirm that you install the Zigbee modules properly on your PC’s serial port with the baud rate settings at 8 data bits, one stop bit, no parity, and 9,600.
- Next, select the local Echo box and “press OK.”
- Afterward, save the session time.
- Then, on the virtual terminal dashboard, look for the connect button and click.
- The next thing to do is name the session after connecting with the Zigbee modules.
- At this stage, your connection to the Zigbee modules is complete.
- Then, you can configure the modules utilizing the AT commands.
Step 2
Here, it’s pertinent to remember that your modules should have between 3.3 to 5 volts. Luckily, the Adafruit XBee Adapter comes with both voltages. But if you can’t get the adapter, you’d have to settle for a different power supply.
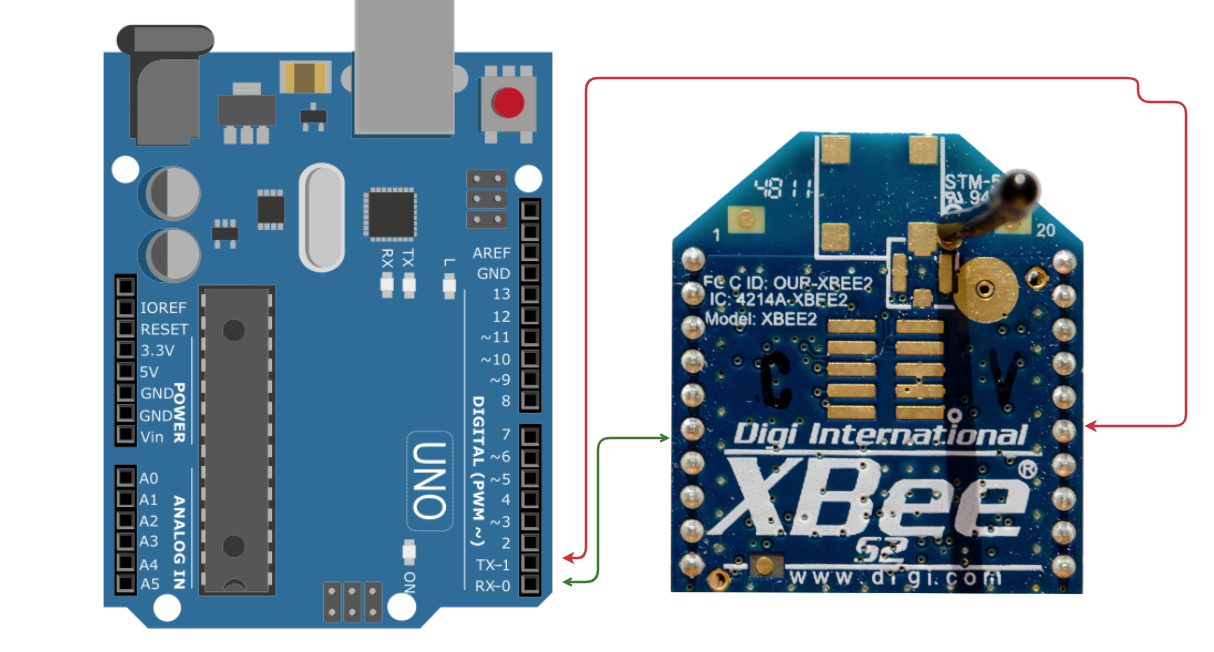
Arduino connection to Zigbee module
Step 3
In the picture above, we can see the RX and TX terminals of Arduino and Zigbee are joining.
Step 4
After the successful connection, Arduino sends code of instructions or messages to the first Zigbee module. Then, the second Zigbee gets a set of instructions from the first Zigbee since they share a similar network address and connect on the setup.
Step 5
Next, the second Zigbee resends the instructions from the first Zigbee to the Arduino via the connected serial pins.
Step 6
Below is the line of code to type after successfully joining the Arduino to the Modules via serial pin communication:


How to Interface ZigBee Module to Raspberry Pi
You can interface a Raspberry Pi with two merged Zigbee modules.
Materials and components required
- Raspberry Pi 4
- Zigbee 1mW Wire Antenna- Series one (2)
- Zigbee Explorer Dongle (2)
Steps
1. First, pair the two Zigbee Raspberry Pi 4 with similar baud rates using X-CTU Software.
2. Then, join both Zigbee to the USB dongles and merge one USB port to the Raspberry Pi.
3. Next, connect another USB port to a PC.
4. Afterward, instate the FTDI driver on your PC to get USB communication.
5. Then, build the baud rate and Hyperterminal before choosing the correlating comport for the connected device communication.
Applications of Zigbee Module
- Wireless robots and remotes
- Wireless network devices
- Homebuilding automation (wirelessly controlled)
- Wirelessly controlled temp sensors
Zigbee module Projects: How to create a Zigbee bridge
Materials You need
- A Zigbee special device (like Osram bulbs, Philips Hue, Belkin switches, etc.)
- USB adapter dongle that supports Zigbee (like CC2531)
- Raspberry Pi
- Zigbee2mqtt app
Steps
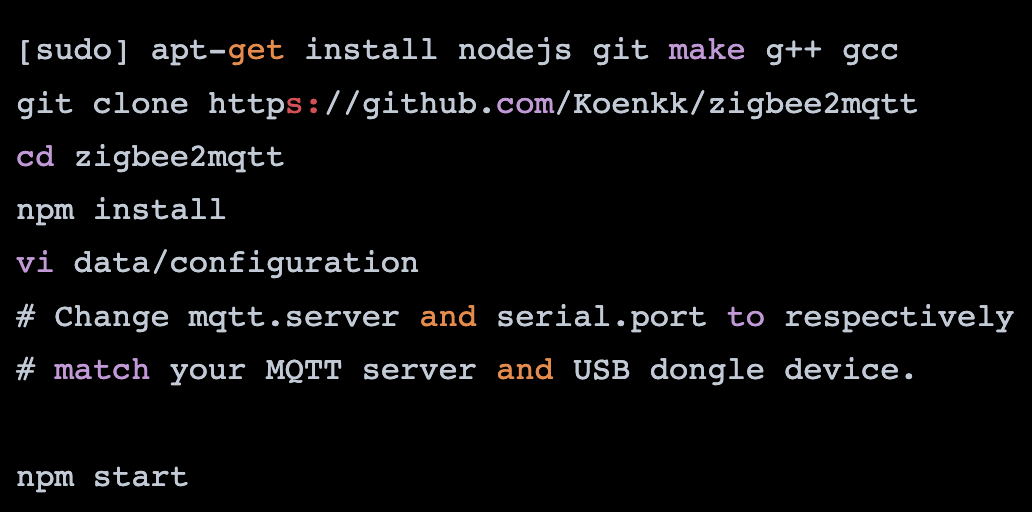
1. First off, run the Zigbee2mqtt app because the platypus uses it on the backend to communicate with the USB dongle. You can follow the instructions on the website on how to get started with your OS and check out the supported devices.
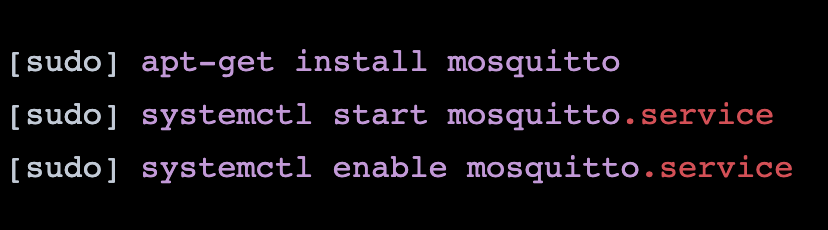
2. After installing the MQTT on your local device, check if your system has a running server. If you’re using Raspbian, Ubuntu, or Debian and want to change to Mosquitto, you can use the code below:
Code screenshot 1
Source: Zigbee2mqtt.io
3. Next, type in this code below to install the zigbee2mqtt
Code screenshot 2
Source: Zigbee2mqtt.io
4. Afterward, create a system service by typing the next lines of code below.
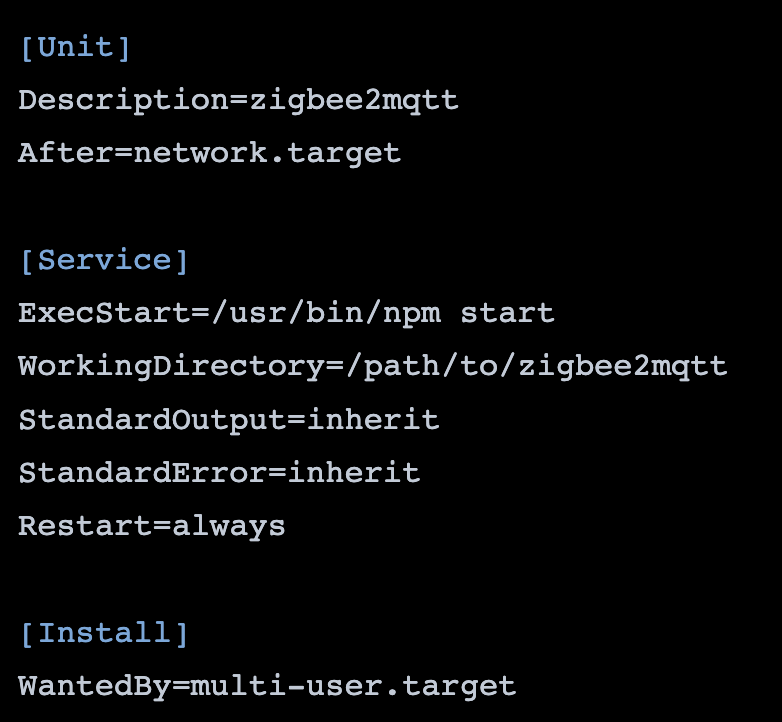
Code screenshot 3
Source: Zigbee2mqtt.io
5. After rubbing the above line of codes, you’ll notice the zigbee2mqtt configuration file. It usually has a permit_join option.
So, you can set this config setup to “TRUE” as you connect the Zigbee appliances in the initial stage. Then, change the config setup to “FALSE” to stop the special device from joining the network by error. Interestingly, it’s something you can change anytime.
6. As soon as you’ve successfully paired your Zigbee special device to a new network, ensure you’re running on “permit_join.” You can achieve this when you do a factory reset on your device. And the approach works strictly on the bound device you’re using. You can do some reset like that of Philip Hue lights on the app. Or you can click the dimmer system’s switch buttons and hold it for a minimum of 10 seconds. Other Zigbee devices may come with their reset button, but it all still depends on the brand you’re working with, as earlier mentioned.
7. After you’ve finished running the setup with all the Zigbee devices connected to the mesh network, you’ll start seeing logs like this:

Code screenshot 4
Source: Zigbee2mqtt.io
8. Next, via the MQTT and HTTP extensions, use the Zigbee to run the Platypus and Redis
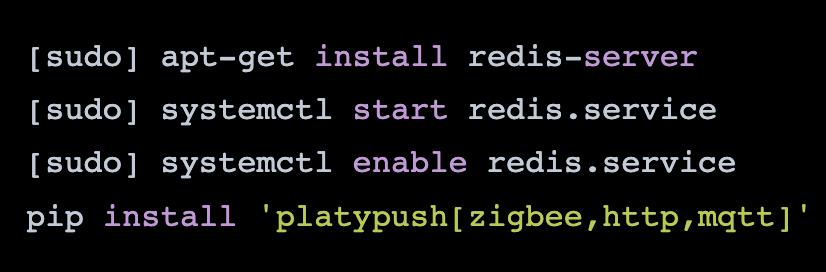
Code screenshot 5
Source: Zigbee2mqtt.io
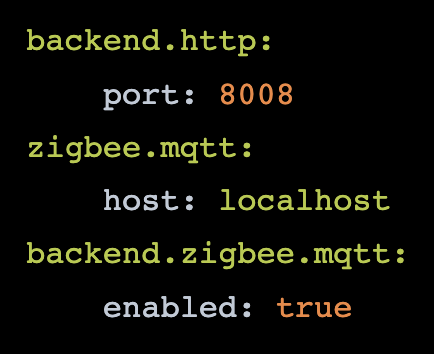
9. Modify the following code file:

By doing that, you’ll be authorizing HTTPS and Zigbee to work.
Code screenshot 6
Source: Zigbee2mqtt.io
10. Next, begin running the platypus or kicking off its system service by opening the host-or-IP (Zigbee IP) in a new browser. That’s where you’ll be able to manipulate and make a few changes to your network.
11. FInally, communicate requests via the default API using a Python code, HTTP, or the configured platypus server-side.

Code screenshot 7
Source: Zigbee2mqtt.io

Code screenshot 8
Source: Zigbee2mqtt.io
Code screenshot 9
Source: Zigbee2mqtt.io
FAQs
Why is ZigBee better than Bluetooth?
In terms of covering a wide range, Zigbee is better than Bluetooth. But when it comes to data transfer, Bluetooth is faster than Zigbee.
Is ZigBee a Wi-Fi module?
No, it isn’t. Instead, Zigbee is WPAN-based, a different technology from the Wi-Fi module.
Why are ZigBee modules so expensive?
Zigbee module price depends on various parameters. But you can expect to get it for $2 to $14.7 per module. Also, they are usually expensive because they have a large memory footprint and computationally intense protocol.
Does Raspberry Pi have Zigbee?
No, it doesn’t. But a RaspBee helps to change a Raspberry Pi into a universal Zigbee gateway due to its small form factor that fits most standard Pi housing.
How do I use Zigbee on Raspberry Pi?
First, you need to attach two ZigBee’s by connecting one to a laptop’s USB port. Then, the second one should relate to the Raspberry Pi2 USB port.
Can a Raspberry Pi be a Zigbee hub?
Yes, it is possible. And that’s because the Zigbee is compatible with Raspberry Pi.
Final Words
The Zigbee module is a device you should consider if you plan to transmit data over a long distance to reach more distant ones. And they usually have low data rate applications that need secure networks and long battery life.
So, do you want to get this module as an automation tool? Or perhaps, you have questions about this topic? Then, please feel free to contact us.


