Have you ever worked with HX711 and load cells? You may have not, but you’ve probably interacted with weight scales. The above components are some of the essential parts of electronic scales. Our article will fundamentally focus on HX711 and its input as a digital convertor in load cell scales. Also, we’ll highlight its pinout, features, and other essential insights into load cell measurements.
Contents
What is the HX711?
It’s a high-precision digital analog-to-digital converter (ADC) with 24 bits valuable in weighing scale applications. Also, it is essential in industrial applications, primarily in interfacing with a bridge sensor.
The HX711 is critical in signal amplification from the load scales cells and transmitting the signal to a microprocessor. Furthermore, it features a 4-pin screw terminal and a Grove I2C connector. These parts are essential in connecting to a microcontroller and load cell without soldering.
Hence, with the hx711 and Arduino library, you can create an Arduino weight sensor system.
HX711 Pin Configuration
Human feet on an electronic scale
The ADC has 16 pins. Let’s look at each of them and their respective functions.
| Pin Number | Pin Name | Pin Function/Description |
| 1 | VSUP | It’s the power supply pin helpful in regulating a power supply of 2.7V to 5.5V |
| 2 | BASE | An analog output pin is responsible for regulator control of the output. Also, if it is not in use, it remains NC. |
| 3 | AVDD | Also, a power supply pin. However, it’s for the analog supply of 2.6 to 5.5V |
| 4 | VFB | It’s the analog input pin, useful in the regulator control of the input. When you are not using it, you should connect it to the AGND. |
| 5 | AGND | This is the ground pin. |
| 6 | VBG | It’s the ADC’s analog output, sound as a reference bypass output. |
| 7,8 | INA-, INA+ | These are channel A’s negative and positive analog input terminals, respectively. |
| 9,10 | INB-, INB+ | Similar to 7 and 8, they are channel B’s negative and positive input channels, respectively. |
| 11 | PD-SCK | It functions as the digital input pin for power-down controls. Also, it is helpful as a serial clock input. |
| 12 | DOUT | The digital output pin. It operates as the serial data output terminal. |
| 13,14 | XO, XI | These are the digital I/O and digital Input terminals, respectively. XO functions as a Crystal I/O, while XI is the external clock input. |
| 15 | RATE | Similar to pin 14, it is a digital input pin. However, its function is output data rate control. |
| 16 | DVDD | Like pin 3, it is also a power supply pin. Nonetheless, it’s primarily a digital supply terminal. |
HX711 Features and Specifications

Weighing a baby on an electronic scale
The following are the ADC’s key features and specs:
- Its operating temperature range is between -40℃ to +85℃. Also, it features an operating supply voltage range of 2.6V to 5.5V.
- Secondly, it is an on-chip power supply regulator, oscillator, power-on-reset, and active low noise PGA.
- In addition, it features differential input channels that are each selectable during operation. Its selectable output data rate is 10SPS or 80SPS.
- Besides, it also has a simultaneous supply rejection of 50 and 60Hz and a power-on-reset feature.
- Its current consumption during regular operation is < 1.5mA, while at power down, it is < 1uA.
- Lastly, it has a selectable gain of 32, 64, and 128 and easy-to-use digital control and serial interface. Thus, it does not require prior programming to use.
What is a Load Cell / Weight Sensor?

Using a weighing scale in the laboratory.
It’s a component that detects a load or force and converts it to an electrical output. Among the fundamental uses of a load cell is to measure an object’s weight. Also, it’s useful in monitoring changes in weight over time. Additionally, it can tell the strain that an object exerts on a surface.
The core part of the weight sensor is a metal with several electrical resistances. Thus, when you apply a force, the electrical resistance changes as the metal moves. Upon the removal of the weight, the metal resumes its original position. The load cell’s quality and accuracy rely on this material’s reversibility.
Hence, load cells will convert mechanical force to digital values. Also, they are of different shapes and sizes, depending on the weight they are designated to measure. Therefore, they are useful in all sorts of electronic weighing scales.

HX711 and Load Cell Project
An electronic scale in a food store
The HX711 is common in commercial weighing scales. However, there are many simple load cell sensor projects that you can undertake. They include:
- Arduino HX711 and Load Cell Scale
- Smart Coffee Table
- Raspberry Pi Kitchen Scale
- An HX711 and Load Cell Arduino Punching Bag
- Arduino Scale With 5kg Load Cell and HX711 Amplifier
Basically, the overarching principle is the same in all the projects. In this article, we’ll focus on Arduino HX711 and Load Cell Scale and Build a digital Raspberry Pi Scale.
Arduino HX711 and Load Cell Scale
Weighing fruits on an electronic scale
The materials you will require for this assembly include the following:
- Standard Arduino Uno/ Arduino Uno Rev 3
- Grove – ADC for Load Cell (HX711)
- 5 Kg Load cell
- A sturdy mounting surface
- Differently colored wires
- Power Supply
Assembly steps
- First, you need to mount the load cell. Usually, the load cell has four holes. Also, it features a label that indicates the direction of the force. Thus, fix the side without the label to the surface that you intend to stay fixed. On the other hand, mount the area with the label with the moving surface.
- Also, ensure that you have attached the moving plate and mounting plate as firmly as possible.
- Next, it is also essential to include rigid spacers between the load cells and the mounting plates. You can either use washers or standoffs for this. Ideally, this is to ensure that applying a force to the moving plate will prompt bending and twisting of the load cell. In the absence of the washers, the load would exert a force on the fixed plate without pressing the load cell.
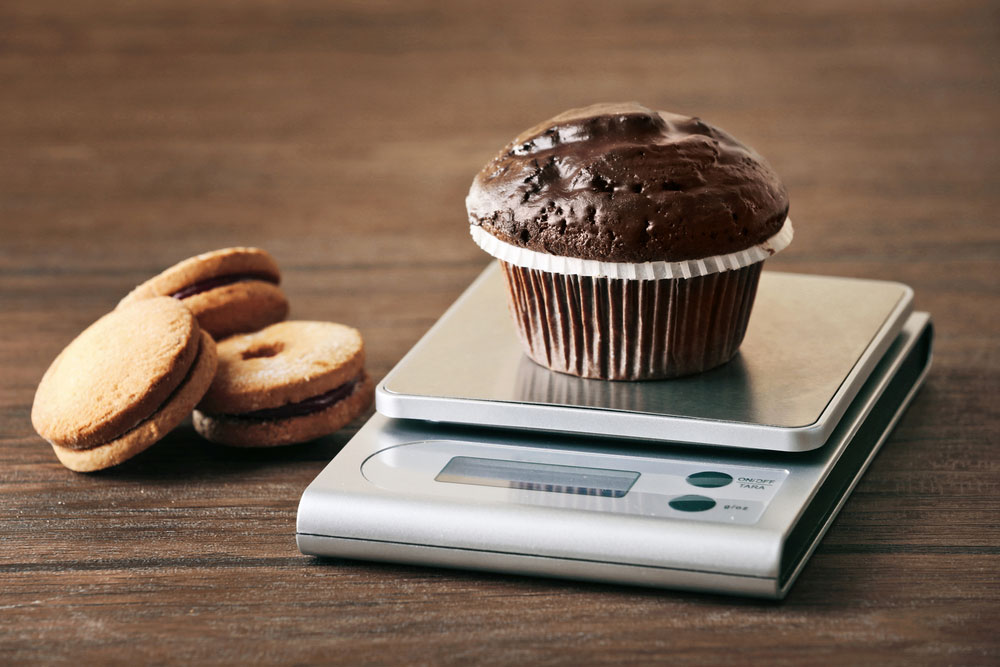
- After this, you need to connect the HX711 to the Arduino and Load Cells. The pinout we looked at earlier should be handy in guiding you on how to go about this.
Circuit Diagram
- Next, add an HX711 Library code to Your Arduino IDE or the Arduino version you’re using. After this, you will need to calibrate the scale then it’ll be ready for use in making measurements.
Build a Digital Raspberry Pi Scale (with Weight Sensor HX711)
An old-school electronic weighing balance
You will require the following materials for this assembly:
- Green HX711
- Load Cell
- Jumper wire
- Breadboard
- Two boards that don’t bend too easily.
- Bolts and matching nuts
Assembly Steps
A multipurpose electronic scale
- First, you need to mount the load cell to the two plates before connecting to the HX711 weight sensor. Hence, using a screwdriver, make holes on the plates. Also, note that you need to separate the load cell from the board using a nut when mounting. It will help in protecting the board.
- Secondly, ensure that you’ve tightened the nuts ensuring the screws cannot slip from the board.
- Next, connect the load cell’s four cables to the weight sensor. Nonetheless, you will realize that the green HX711 features six terminals while we only need four. Thus, make the connection as follows:
| Wire | Green HX711 Terminals |
| Red wire | E+ |
| Black wire | E- |
| White wire | A+ |
| Green wire | A- |
- After making the connections, you should leave B+ and B-. Also, note that you could have S+ and S- instead of A+ and A-in other versions of the sensor. Just know that they represent the same thing.
- Subsequently, you now need to connect the sensor to the Raspberry Pi. Here the wiring is less sophisticated as you now have four connections. Hence, connect the two as follows:
| Weight Sensor | Raspberry PI |
| VCC | Supply Voltage Pin |
| GND | Ground |
| SCK | GPIO 6 |
| DT | GPIO 5 |
- Once you are done with the connections, run the Raspberry Pi weight sensor software code. Lastly, calibrate the Raspberry Pi Scale with known weights, and it’ll be ready for use.
HX711 Applications
A digital kitchen scale
- It’s useful in industrial control applications and electronic weighing scales.
- Also, it’s essential in smart elevators and automatic doors.
Summary
As you have seen, the HX711 is one of the most important parts of electronic weighing scales. Also, it has numerous other applications that we have explained above. Additionally, using the information we’ve provided you, it’s possible to build different scales. All you need is a load cell, HX711, and Arduino. Contact us if there’s anything more you’d like us to clarify, and we’ll get back to you promptly.


