Are you looking for an Arduino or Raspberry Pi alternative to power your next-gen internet of things (IoT) projects? Then, the Intel Edison loT is your go-to.
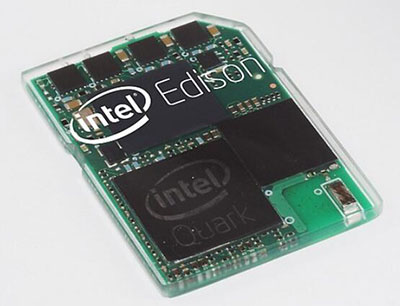
The Edison is roughly the size of an SD card but powerful enough to run a complete Linux distribution.
Though Intel discontinued the Edison series, it still offers an excellent alternative for a mini-computer circuit.
So, in this article, we’ll go through everything you need to know about Intel Edison. And even compare it to other microcontrollers.
Contents
Introduction to the Intel Edison for IoT
The Intel Edison is a small and powerful development board. Though it’s small, it offers excellent connectivity and low power consumption. So, if your project requires these two factors, you’re in for a treat.
Plus, Intel designed this board with wearables in mind.
But that’s not all. You can use two kinds of breakout boards with Edison. First is the Intel Edison breakout board. The second is the Intel Edison breakout board for Arduino–we’ll discuss this later.
For a proper introduction to the Intel Edison, we’ll be breaking it down into its specifications, breakout boards, and software.
Specifications
- 500MHz Intel Processor
- Quark MCU (100MHz)
- 1GB RAM
- eMMC flash memory (4GB )
- WiFi
- 4.0 Bluetooth
- UARTs
- I2C
- SPI
- USB
- GPIO (40 pins)
Breakout Boards
Edison’s 70-pin connector makes direct use tricky. So Intel developed two breakout boards to make prototyping easier.
One is the Arduino breakout board, while the other is the Edison breakout board. These boards offer different purposes, IO capabilities, and sizes.
Intel Edison Breakout Board
The Edison breakout board is a bit larger than the Edison itself. But, it still manages to maintain the small-form feature of Edison.
Additionally, the board comes with a small but powerful set of features. Thus, you can expose the native 1.8v I/O of the Edison and access a USB OTG–with a Micro Type-AB connector.
Other features include a 0.1-inch grid I/0 array of through-hole solder points, a USB OTG power switch, a battery charger, and a USB-to-device UART bridge. Plus, the UART bridge comes with a micro-type-B connector.
Lastly, you can save a good amount of space with this board.
Intel Edison Board for Arduino
Alternatively, the Arduino breakout board offers a more prosperous and extensive interface. Plus, its I/O pins make the Intel Edison compatible with Arduino.
Also, the breakout board features 20 digital I/O pins with 4 PWM output pins. You also get six analog inputs, I2C, UART (Rx/Tx), ICSP 6-pin header (SPI), and a connector with USB host Type-A or Micro USB.
But there’s more. It also features a USB device connected to the UART and an SD card connector.
Software
In truth, the default image of Edison is the Yocto Linux image. However, you can run any Linux distribution you want.
Also, you can use Yocto to develop tailored images.
Plus, you can configure and customize it to create a custom image for your project. And it’s easy to do this with simple Yocto project commands.
Interestingly, devices with complete Linux distributions open up different possibilities. For example, you can easily reuse the available libraries and packages to develop a more accessible and faster product.
Here’s the icing on the cake. You don’t need to learn new languages or use toolkits or SDKs. Instead, you can develop directly on the standard GNU/Linux device.
However, Intel covers you if you need tools to start developing. Here are some of them to help you get started.
Edison SDK
Now, you can get everything you need for developing with the Edison SDK. Interestingly, this works based on Eclipse and includes all the cross-compile tools, documentation, and basic library required for developing your project.
You also get a connector to debug and deploy your software to the board. Plus, the Edison SDK is great for developers using C++. However, you can use other languages if you choose.
Intel XDX IoT Edition
The Intel XDX variant allows you to write Javascript applications and test them directly. In addition, with this tool, creating HTML5 applications that can communicate with the Edison board is easy.
Wyliodrin
You don’t need to learn programming languages with Wyliodrin. Instead, you can program with simple drag-and-drop tools. So, if you’re a beginner, this is an excellent tool.
Arduino
The Arduino breakout board allows you to run Arduino sketches on your Edison. Plus, with the perfect version of Arduino IDE, you’ll have access to various illustrations, libraries, and examples.
Libraries
Intel developed two libraries to give you a seamless developer experience. First is Lib MRAA, a C/C++ library that can interface with the I/O of Edison. Next is UPM, which is a high-level repository for Lib MRAA sensors.
Intel Edison Project
There are several projects you can create with Intel Edison. One project showing Intel Edison’s unique features is the Intel Edison weather advisory sketch.
Here’s what you’ll need for this project:
- Project Code
- Arduino IDE
- Intel Edison Board
- Grove starter kit ( most of the components are from this kit
- Buzzer (optional)
How to Do this Project
Step 1: Get Your Code
You can get the code for this project by clicking the link above. If you’re using Linux, copy the code to Edison with the SFTP software. Alternatively, you can use the WinSCP program on Windows.
Now before you move to the next step, ensure you copy the script files to the proper Edison directory: /home/root/
Step 2: Get a Command Prompt by Connecting Your Edison
You can follow this guide by intel to properly connect your Edison using a USB serial port.
However, you can stop connecting when you get a command prompt.
Step 3: Move Files to Their Proper Location
Ensure you place your three Linux scripts in their proper locations. Some file paths require the following areas:
- /home/root/my weather service.pl
- /home/root/myweatherservice_wrapper.sh
- /etc/systemd/system/multi-user.target.wants/my weather service.service
When you start your Edison, the “system” will open “my weather service. service script.” Then, it’ll open “myweatherservice_wrapper.sh,” and finally, “my weather service. pl scripts.”
Step 4: Configure Your WiFi
For this step, we recommend using the SSH protocol for your programming. Also, we recommend using the 2-micro USB cable method to set up your Edison.
These USB devices will serve as a thumb drive so you can copy your USB serial port and OS image.
First, run a PuTTY session to connect Edison with the USB serial port. Then use the USB serial port to set up WiFi.
How? You’d have to set your Edison IP address with the USB serial port. Then use the SSH protocol on your PuTTY to place it on your Edison.
Now, you can connect your Edison to your WiFi access point and access web pages from weather stations.
Step 5: Install Your Grove Starter Kit
Next, plug in your Grove breakout GPIO board and connect the RGB LCD to any Grove’s I2C ports. Also, you can connect a buzzer to GPIO 3. But this is optional.
Step 6: Reboot, Test, and Customize
You can reboot your Edison to complete this project. However, you’d have to wait 20 seconds for your WiFi connection. Once you have a relationship, you can get a weather station XML file.
If it works, it should display the weather from weather stations close to you.
Also, you can customize your XML file with your Linux script (my weather service. pl) to set your preferred weather stations.
Note: Use the Arduino IDE to install your WeatherAdvisorySketch.to sketch on the Arduino of your Edison.
How to Pick the Intel Edison for An IoT Prototype
Here’s how to select the right Intel Edison for your IoT prototype:
- First, determine if you need an extension board
- Check out tips for assigning tasks to GPIOs
- Check if the voltage and current work with your components
- Choose a proper power source
- Think about it before you start building
Intel Edison vs. Raspberry Pi
Choosing between the Edison board and a PI board depends on your project. If you need an energy-efficient and cost-efficient board, then the Intel Edison is your go-to. It also has a faster ram, dual-core CPU, and energy efficiency capabilities.

Intel Edison vs. Arduino
Intel Edison offers a smaller size, more computing power, and speed when compared to an Arduino board. Plus, the Intel Edison is fully compatible with Arduino software. So, you can get Arduino features on a faster board.
Intel Edison IoT: Intel Edison Replacement
Since Intel discontinued the production and selling of all Intel Edison SKUs, the Variscite DART-6UL SoM is the next best alternative.
FAQs
How do I Connect to Intel Edison?
You can follow the steps above to connect your Intel Edison to a WiFi network or check out this guide by Intel.
Intel Edison IoT: Why was Intel Edison Discontinued
Intel never announced specific reasons for discontinuing the Intel Edison, but it did release a product change notification to announce the discontinuation.
What is the function of Intel Edison?
You can use Intel Edison for a wide range of projects. But, it mainly works for wearable devices and IoT.
Wrapping Up
In truth, Intel Edison is a solid competitor for Raspberry Pi and Arduino controllers. The small development board was powerful enough to handle several projects and do some gaming.
Indeed, no new versions compete against the more recent versions of Raspberry Pi and other development boards. But, it does hold its own against the popular Raspberry Pi 3 model and serves as a good alternative.
So, do you have any questions regarding Intel Edison? Let us know, and we’ll be happy to help.