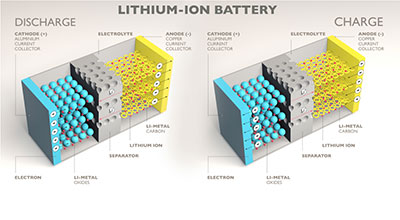
The Lithium-Ion Battery Charger Circuit is popular because of its excellent energy density, high cell voltage, and reasonable load characteristics. Everything from small electronic devices, smartphones, and laptops to vehicles now feature lithium chargers.
The wonder-working lithium battery charger circuit consists primarily of three elements—a variable voltage regulator, switching transistors, and current limiter resistors.
With the surge in Li-ion battery charger popularity, you need to be abreast with all the relevant details. Therefore, we will create a concise resource centered on the Lithium battery charger.
Let’s dig in!
Contents
- 1 Is Charging a Li-ion Battery Difficult?
- 2 Simplest Li-ion Charger Using a Single MOSFET
- 3 A Li-ion Battery Charger Using LM317 As The Controller IC
- 4 A Lithium-ion Battery Charger Using An IC 555
- 5 What is Involved In The Process Of Charging Multiple Li-ion Batteries?
- 6 A 3.7 v Li-ion Battery Charger Circuit
- 7 Conclusion
Is Charging a Li-ion Battery Difficult?

Fig 2: A stack of Li-ion batteries
At some point, your Li-ion battery would convert all its stored chemical energy to electrical energy. When the battery’s electrolyte reduces in this way, you would have to recharge the device.
Charging a Lithium-ion battery is simple. It is similar to how you charge other batteries. The entire process is easily a summation of setting, stabilization, and termination.
There are a few critical considerations to put in place to get the best results from the charging process. These include; ensuring an auto cut-off at the whole charge level, supplying a constant voltage, and constant current input.
Simplest Li-ion Charger Using a Single MOSFET
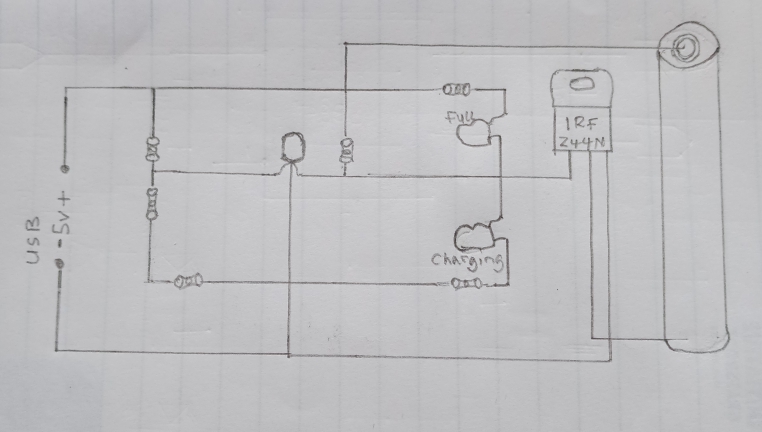
Fig 3: Schematic of a charging Li-ion Battery
- Materials Needed
A single MOSFET, a 470-ohm quarter Watt resistor, and a trimmer are needed.
- Design Principle
Because only safe amounts of low input current can be generated and conducted by this circuit, the cell would never get too heated. In this way, there is no need for temperature regulation, the materials used in the design ensure it.
- Set up
Adjust the trimmer to get a 12 Volt direct current input across the charging terminals. Connect the trimmer and the 47k resistor. Allow constant recent influx of around 0.5C to flow through the cell.
A Li-ion Battery Charger Using LM317 As The Controller IC
Primarily, an LM317 helps to supply a constant and steady voltage to the output. Like the LM338, the IC LM317 is also very popular among battery charger circuits.
As an added advantage, LM317 is also very easy to use in a DIY assembly project.
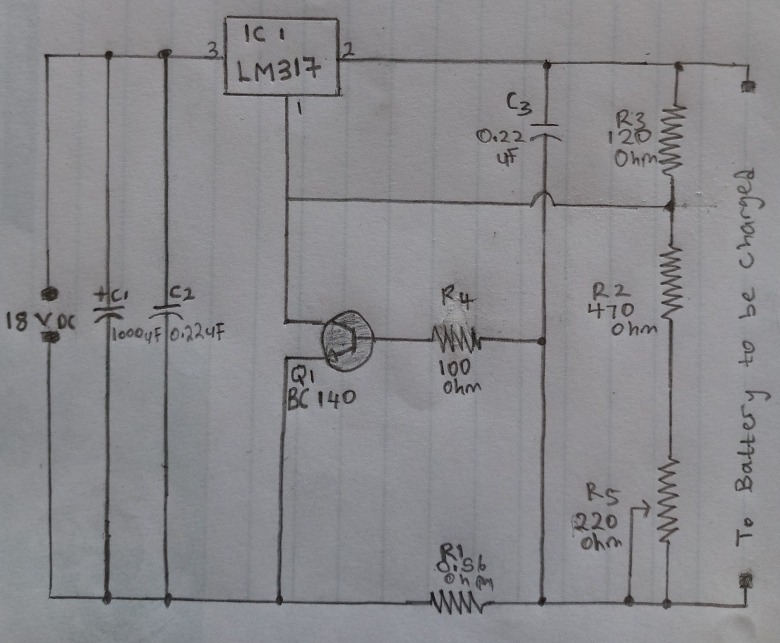
Fig 4: Battery Charging using LM317
- Materials Needed
You would need some materials to craft the AA battery charger schematic. They include; resistors or loads, a Li-ion battery, some wires, monitor pins, and the Integrated Circuit LM317 transistor.
- Design Principle
The principle at play here is that of how constant voltage and constant current supply would get the Li-ion battery charged.
- Set up
Allow the central slider arm of the preset to make contact with the ground rail of the circuit. Adjust the preset until the SCR cuts off the voltage supply. Connect the battery and switch on the power.

A Lithium-ion Battery Charger Using An IC 555
IC 555 is a very cheap, popular, and exact timer; its use in any electrical setup is to determine time accurately. Even though it has frequency division applications, it is mainly an alarm source in circuits.
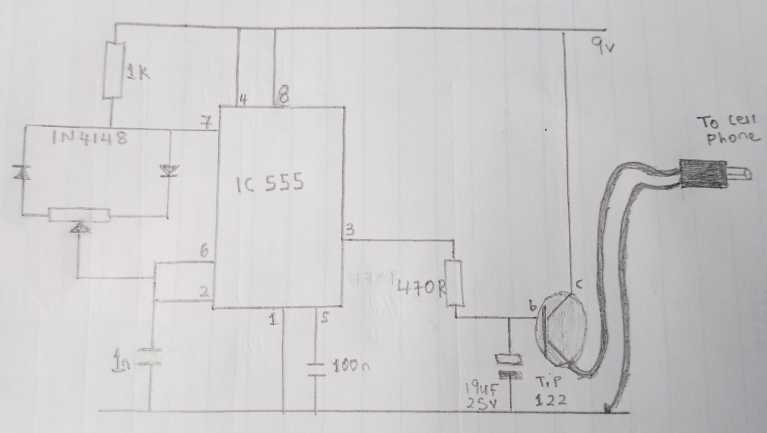
Fig 5: Lithium battery charging using an IC 555
- Materials Needed
The lithium charger circuit comprises a li-ion battery, preset pins, resistors, diodes, a transformer, and the IC 555.
- Design Principle
Above all else, this circuit requires a timer in a Li-ion Charger circuit. Li-ion batteries do not usually over-charge; they could destroy their cells.
That’s why we need a timer in their chargers.
- How to set up
Connect all the sensor pins to the battery. Include the IC 555 and the transformer in the circuit. Finally, set the transformer voltage to a maximum of 6 volts. The current rating should also be about 1/5th of the battery AH rating.
What is Involved In The Process Of Charging Multiple Li-ion Batteries?
It is the way to go about everything if you want to simultaneously charge at least 25 Li-ion batteries.
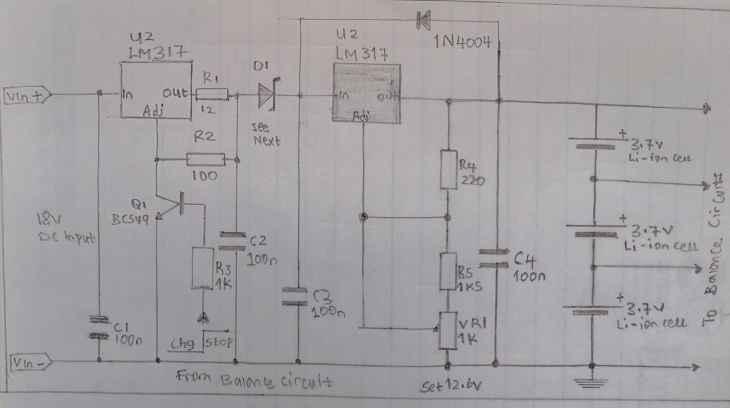
Fig 6: Charging multiple Li-ion Batteries
- Materials Needed
Total numbers of Li-ion cells to be charged, a single voltage source, a temperature sensor
- Design Principle
By monitoring the temperature content and heat dissipated by the setup, you can charge multiple Li-ion batteries simultaneously.
- How To Set Up
Connect all the Li-ions in parallel, attach them to the temperature sensor, the diode, and the battery source
A 3.7 v Li-ion Battery Charger Circuit
Constructing this charger is quite technical because you need to understand SMD soldering to succeed at the task. A more practical alternative is to procure the charger module from stores online.
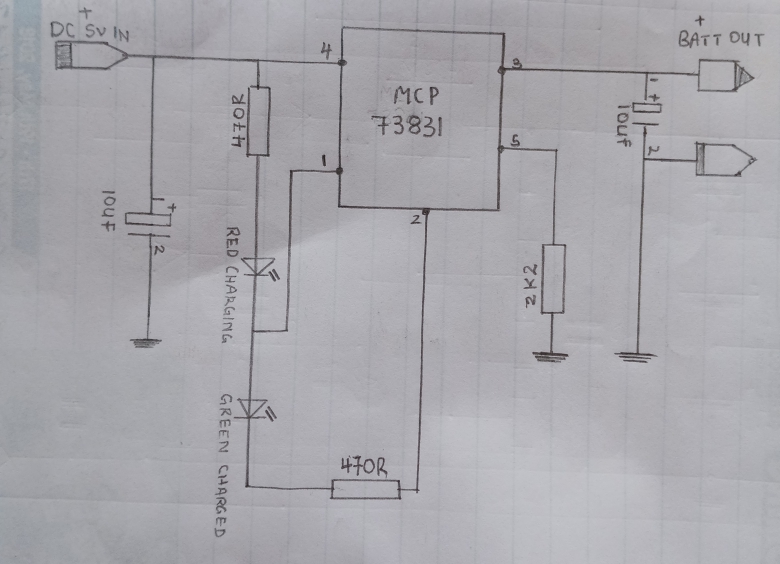
Fig 7: 3.7V Lithium-ion charger circuit
- Materials needed
A microchip MCP73831, resistors, a 5VDC power source
- Design Principle
You can use a standard 3.7-volt lithium-ion battery charger to charge a 3.7 V Li-Ion Cell up to 4.2V. The charger performs its function by increasing voltage from 0.25 V to 4.0 V in an hour at a 1 amp constant current charging rate. At the saturation stage, the voltage peaks at 4.2 volts.
- How To Set Up
Connect the resistors, microchips, and power source around the MCP chip. Now connect the battery and switch on the power.
Conclusion
The process of charging Lithium-ion batteries is pretty straightforward. We have explored several ways you can set your Li-ion battery.
You can reach out to our trained experts for guidance and help on how to charge your Li-ion battery.


