Contents
What is Hysteresis in Opamp?
The topic of opamps Hysteresis will start to make sense once we define the word Hysteresis. Simply put, Hysteresis means to lag or follow behind or resist change from a former state. Plus, in engineering, Hysteresis describes non-symmetrical operations, or in simpler words, the path from A to B is different from B to A.
What’s more, you can find Hysteresis in areas of magnetism, non-plastic deformation, and, of course, electronic circuits such as opamps (which work as comparators).
To further break it down, let’s take a look at a simple example to help pin what Hysteresis in opamps means.
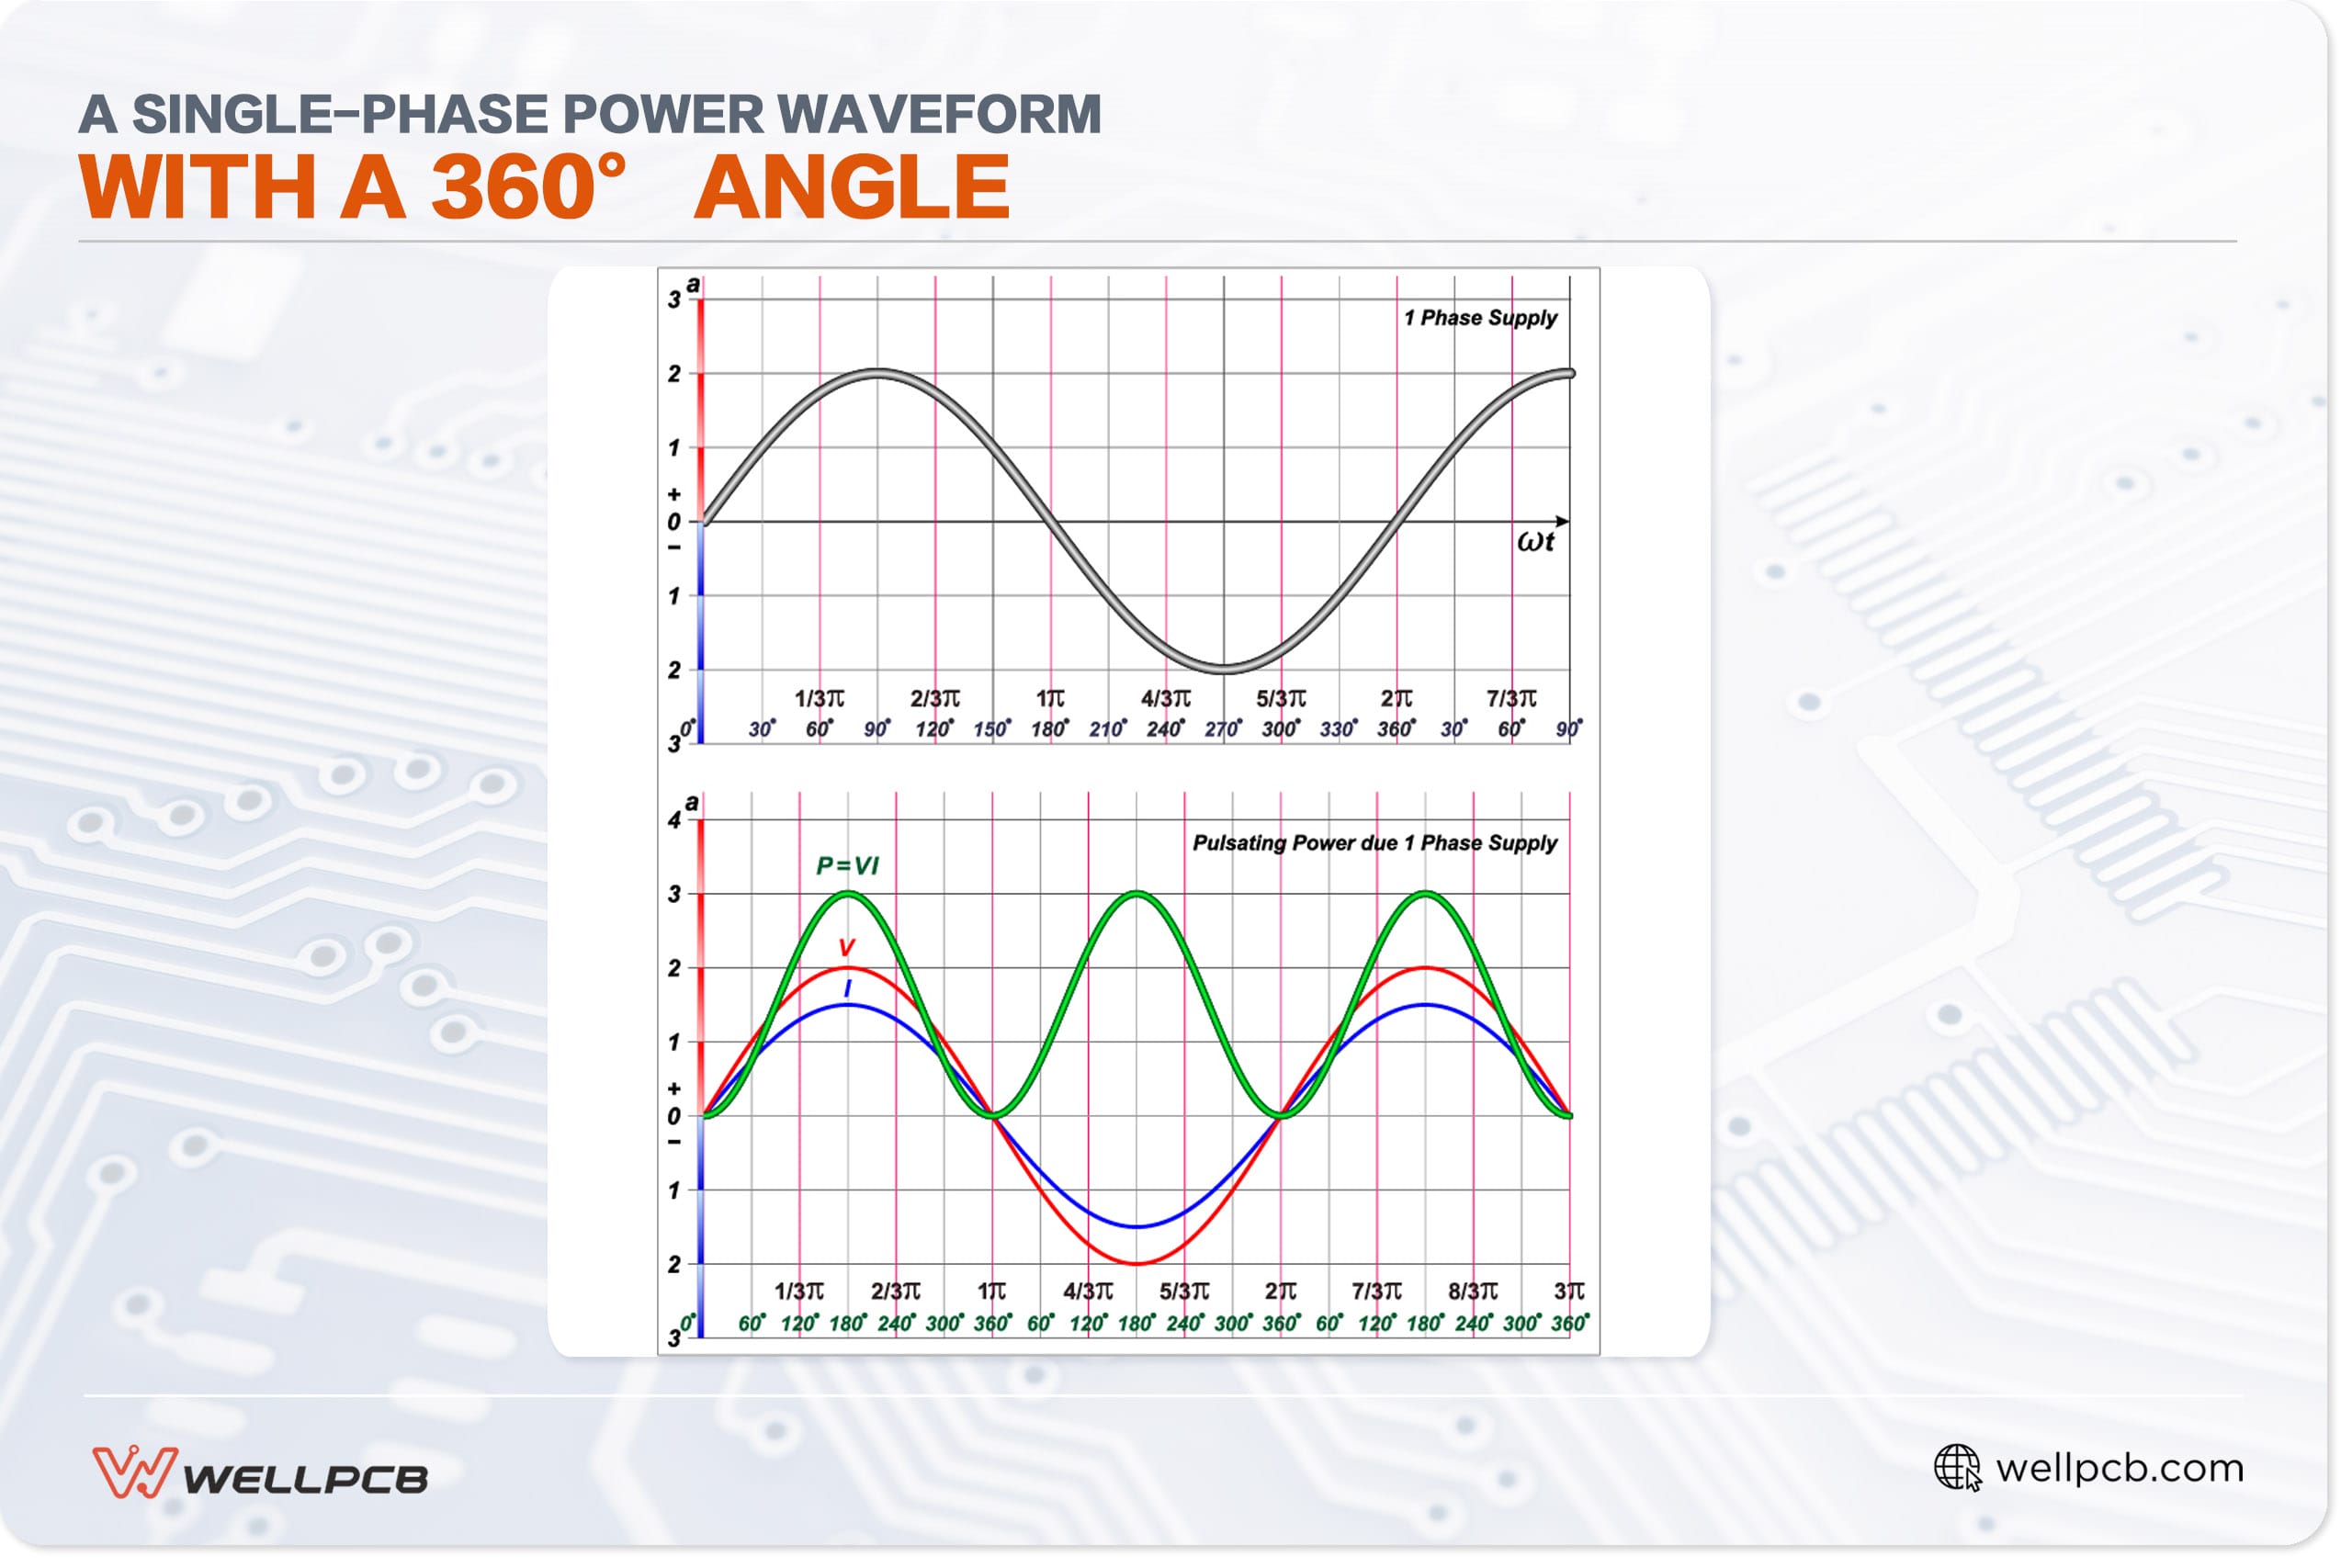
When you connect a 12-volt relay to a variable power supply and slowly increase the input supply voltage from 0 – 12, you will notice that at around 11 volts, the relay will activate.
So, usually, if you reduce this voltage, it should switch off the relay. But that’s not the case. The relay will only switch off once the voltage goes way below 9 volts.
The difference between the activation and deactivation thresholds of the relay is what we call a voltage lag, and this voltage lag is what we refer to as Hysteresis.
Now, Hysteresis can have adverse effects on electronic circuits like single BJT circuits, and it prevents you from keeping any fixed threshold levels on your course. So, most times, the hysteresis level is reduced to the minor level possible—to maintain control over the circuit’s threshold values.
In contrast, opamp circuits are effective at avoiding hysteresis effects when handling certain operations. For most opamp battery charger circuits, the absence of Hysteresis becomes a significant disadvantage.
So, in situations like this, you’d force additional hysteresis into the circuit by installing a feedback resistor across the opamp outputs and on one of its input pins.
Thus, it would help include the hysteresis effect in your opamps circuit.
On the other hand, most comparators come with built-in Hysteresis, and these comparators usually have a value between 5mV to 10mV. Also, the internal Hysteresis of these analog comparators helps them prevent oscillations from minimal amounts of parasitic feedback.
However, any external noise of greater amplitude can block the internal Hysteresis of these comparators, even though it’s enough to stop self-oscillations. In situations like this, simply including external Hysteresis would solve the problem.
Principle of Operation
Although Hysteresis is not wanted in some circuits, it’s still valuable for analog circuits since it helps control switching in circuits with transistors. Thus, you can use Hysteresis in a comparator circuit to set the duty cycle of the output waveform.
Note: Opamps and comparators are two essential and equal components in these circuits. More importantly, an opamp can work as a comparator, but not all comparators can work as amplifiers.
For this reason, the two terms can work interchangeably since Hysteresis is important for both circuits. Plus, understanding how these circuits work goes a long way in understanding how Hysteresis works in advanced courses.
Now, comparing two standard integrated circuits with the opamp and the comparator makes it easier to understand how Hysteresis works in some of these circuits and how to use it to modify the switching behavior of these circuits to what you want.
The first impression you get from the above diagram is how similar the two components are. However, there are differences, like the comparator being a grounded emitter while the opamp isn’t. For this reason, the comparator’s output works well for saturation. On the other hand, the production of the operational amplifier works better for linear operations.
Integrated Circuit
Hysteresis in a Comparator
Hysteresis in a simple comparator circuit is responsible for the production of stable switching behavior. When you add a positive feedback resistor, it creates a hysteresis in the course, which sets the threshold for switching whenever the input signal increases or decreases.
Here’s the tricky part.
The spurious noise on the input signal can affect the whole process. Thus, producing multiple transitions as the input signal increases. So, adding Hysteresis to the comparator circuit counters any mistake switching caused by noise.
Hysteresis in an Operational Amplifier
The Hysteresis in an opamp is similar to how positive feedback creates hysteresis voltage in a comparator (not negative voltages). Thus, this allows the opamp to form a Schmitt trigger circuit.
Here’s where things get interesting.
When you drive an operational amplifier as a closed-loop circuit to saturation (with Hysteresis), the output will saturate and give you the same results you would get from a comparator. It works for inverting input and non-inverting input.
Comparator without Hysteresis
Here is a standard comparator circuit without Hysteresis. For this circuit, the voltage divider network, Rx and Ry, creates the minimum threshold voltage used by the course. So, the comparator assesses and compares the input voltage range (Vin) to the fixed threshold voltage (Vth) to find the relationship between voltage.
Now, connecting the input feed voltage (you want to compare) to the circuit’s inverting input creates an output with inverted polarity.
Thus, anytime the voltage difference of the input bias current is more significant than the threshold, the output would move closer to the negative supply. Likewise, the comparator output would move closer to positive supply rails if the point is higher than the input reference voltage.
While this technique has its benefits, like deciding whether a signal is above a set threshold, it has one problem. The noise on the input signal can create multiple transitions both above and below the fixed point, which triggers fluctuating results.
You can see the multiple transitions in the above diagram. Imagine the input signal as a temperature parameter, and the output was a critical temperature application to make things more transparent. Now, the inconsistent output signal may not give you the desired results.
Or, imagine you need the output of a comparator to run a motor or valve. The fluctuating signal would switch the valve on/off multiple times in critical threshold situations.
Luckily, this is a problem that Hysteresis solves as it completely counters the shaky signal when switching thresholds and gives some kind of noise immunity.
Comparator with Hysteresis
Now, here’s a diagram of the comparator circuit with Hysteresis. Here, the resistor RH focuses on the threshold level of the Hysteresis. So, anytime the output voltage becomes logic high (5V), The RH would parallel Rx. Thus, allowing extra direct current to flow into Ry and increasing the threshold (VH) limit to 2.7v. Also, the output response won’t change to logic low if the input current is not higher than the threshold voltage (2.7v).
However, when the output is on logic low, Rh becomes parallel to Ry. Thus, reducing the current flowing into Ry and dropping the threshold voltage t0 2.3v. Now, to go back to logic high (5V), the input signal must be lower than 2.3 v.
Design of Hysteresis Comparator
So, to break down the design of the hysteresis comparator, we’ll look at the schematics, the components, and the design.
Schematics
Take a look at the diagram below:
Required Electronic Components
- (1) Printed circuit board (PCB)
- Comparator (here, you can use any comparator. For instance, we used a TLV3201 for low-power applications. This comparator has a low quiescent current)
- standard metal film resistors (0.1%)
Design Requirements
- +5v supply voltage
- 0v to 5v input
Hysteresis Comparator Design
For the designs, we can use equations (1) and (2) to select the resistor values for creating your hysteresis threshold voltages (i.e., VH and VL). Plus, you’ll need to pick out an RX with a single value.
We determined that our RX would have a 100k rating. We chose this rating, so RX would work to minimize the current draw. On the other hand, we implemented Rh with a 576k value. Thus, we confirmed equations (1) and (2) in Appendix A: Rh/Rx = VL/VH – VL.
Final Words
Comparators are helpful when it comes to differentiating between two signal levels. For instance, you can use a comparator to distinguish between normal and over-temperature conditions.
Also, the variation of noise or signal at the threshold for comparison results in multiple transitions. So, the advantage of Hysteresis in a comparator circuit is that it fixes a lower and upper point to solve the problem of numerous transitions.
Well, that wraps up this article; if you have any questions, feel free to contact us.