There are many ways to build programmable and exciting electronic projects. For one, you can use the more popular Arduino or Raspberry Pi boards. But, if you’re looking for an easier way to Xilinx platforms, you need a PYNQ board.
In truth, a PYNQ board can open up different possibilities for programming while building electronic projects.
How does the board work? This article will show you what a PYNQ board is, how to use it, what you can do with it, and more.
Let’s begin!
Contents
What is a PYNQ Board?
PYNQ boards are development boards that use the PYNQ program. PYNQ is a Xilinx-developed project that works with Xilinx platforms. Also, it’s quite easy for designers to use these platforms.
Furthermore, Python and its libraries are the major programming languages for PYNQ boards. So, designers can take advantage of this to build unique projects.
PYNQ-Z1
The PYNQ-Z1’s design is compatible with the PYNQ framework. And you can develop the board’s SoC using Python.
In addition, the board’s design is similar to the Xilinx Zynq-7000 SoC. And the design combines an FPGA’s programmability with a powerful dual-core processor.
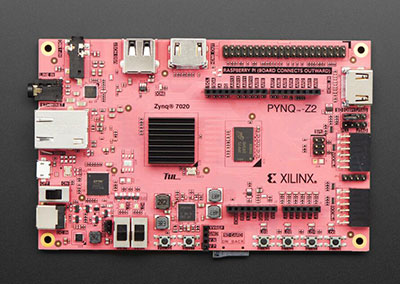
PYNQ-Z2
On the other hand, PYNQ-Z2 is an FPGA-based development board that revolves around the ZYNQ XC7Z020. Also, its PYNQ support allows embedded programmers to explore Xilinx ZYNQ SoCs completely without limitations.
PYNQ-ZU
PYNQ-ZU also has designs that intensively support PYNQ. But, its design revolves around the Xilinx Zynq Ultrascale+. In addition, the board has several features and expansion interfaces that allow you to use it with other development boards.
PYNQ-Z1 Board Features
The PYNQ-Z1 is a state-of-the-art SoC development platform that’s powerful and easy to program. In addition, the board’s hardware and software offer exceptional features that make this board attractive to designers, embedded programmers, etc.
For its hardware, the PYNQ-ZI features Pmod ports, HDMI in/out, audio out, onboard I/O, connectivity features (USB and Ethernet), and Arduino headers. Interestingly, all these features make the PYNQ-Z1 customizable and incredibly versatile.
Also, the board is perfect for applications like IoT, embedded computing acceleration, computer vision, encryption, and industrial control.
The PYNQ-Z1’s software also has some pretty impressive features. For instance, it uses the PYNQ open-source framework.
Also, you can set the PYNQ-Z1 boot image from a microSD card. Further, it’s free to download and easy to copy to your SD card. Alternatively, you can buy an SD card already loaded with the boot image.
Additionally, designers can use Xilinx’s Vivando Design Suite tools to contribute new hardware libraries, which is free.
How do I use PYNQ?
The good news is that it’s pretty easy. But, you’ll need to set up your board first.
What You Need
The things you need to get before you can use PYNQ include:
- PYNQ-Z1 board
- Micro-SD card (blank or with pre-loaded image)
- A computer with a supported browser.
- Micro USB cable
- Ethernet Cable
Setting Up Your Micro-SD Card
You can purchase a preloaded SD card from various online stores. But, if you have a blank SD card, follow the steps below:
- First, download the PYNQ-Z1 boot image here.
- Afterward, extract the content of the zipped file.
- Then, write the image to your SD card. (we recommend using at least 8GB).
And that’s it. Now you have your PYNQ image ready to boot.
How to Setup Your Board
You can easily set up the PYNQ-Z1 board in the six steps below:
- First, set the board to boot from the SD card by positioning the boot jumper on two top JP4 pins. As a result, it would put the boot jumper in the SD position.
- Next, power the board with a USB cable or a 12V power regulator. To use the USB, position the power jumper on two top-position pins. For the 12V regulator, you can set the jumper to REG.
- Then, put in your loaded SD card. The SD card slot is under the board.
- Use your USB cable to connect your computer to the PYNQ-Z1 board (the USB port is the PROG UART port).
- Then, plug in your Ethernet cable. We’ll take a deeper look at this later.
- Finally, switch on the PYNQ-Z1. If you don’t know how to do this, check out the instructions below.
Setting up the Ethernet
There are two ways you can connect your board to Ethernet. You can use either a network router or a computer.
Note: We recommend connecting to a network router to keep your board up-to-date and get recent packages.
Connecting to a Network Router
If you use this option, your board will get an IP address. However, you must have permission to connect to that network. Otherwise, you’ll face some network issues.
Here’s how to connect to a network router or DHCP network:
- First, connect your PYNQ-Z1 to the router or switch with an Ethernet cable.
- Then, make sure you connect your computer to the same router or switch through Wi-Fi or the Ethernet.
- Next, go to the following web address: http://pynq:9090/ to connect to Jupyter Notebooks.
Pro tip: You can choose to change your Hostname or configure your proxy settings. But, it’s not necessary.
Connecting to a Computer
An Ethernet port on your computer is necessary for this option. Also, you’ll need permission to modify your network’s interface.
Connecting to a computer would allow you to use PYNQ directly. But, you won’t have internet access, which means no updates and new packages.
Here’s how to make this connection:
- Set a static IP address for your computer.
- Then, use an ethernet cable to connect your board to your computer.
- After, go to the following address: http://192.168.2.99:9090/ to connect to Jupyter Notebooks.
Pro Tip: You can grant the board internet access through this option. But you have to bridge your board’s Ethernet connection to the computer’s Internet.
How to Switch On Your PYNQ-Z1
First, flick the power switch and check if the Red LED comes on. If it comes on immediately, then the board has power. Next, wait a few seconds for the Green or Yellow LED, which confirms the Zynq device works.
Then, wait for two blue LEDs to flash on and off and four Green/Yellow LEDs to stay on. After this, your system is ready for use.
How to Connect to Jupyter Notebooks
Your mode of connection determines how you’ll connect to Jupyter Notebooks. After visiting the address above on a web browser, you should see a login page. The username and password: Xilinx.
Also, changing your hostname or static IP will mean changing the web address you visit to access Jupyter notebooks.
PYNQ vs. ZYNQ
ZYNQ incorporates the programmable FPGA hardware and ARM-based processor software into one SoC. PYNQ also has designs based on ZYNQ but includes the ability to program with python and its libraries.

How is PYNQ Delivered for ZYNQ Boards?
There are two ways to deliver PYNQ to ZYNQ boards. First, you can use a bootable Linux image with the PYNQ python package. Or, you can use a python package designed for host computers like AWS-F1.
Example Projects
Here are some project examples of the PYNQ-Z1:
- Xilinx’s PYNQ Computer Vision
- PYNQ BOT
- PYNQ Repository
- Deep Learning (PYNQ)
- Networking (PYNQ)
PYNQ FPGA
PYNQ allows designers and embedded programmers to use FPGA through Python and Jupyter notebooks.
Rounding Up
PYNQ boards are pretty different from other available development boards. They offer exciting hardware and software features and can handle advanced tasks and applications–like deep learning and computer vision.
It also uses the intuitive python programming language and makes it easy to program and build exciting projects.
So, what do you think about using PYNQ boards? Do you need help with getting one? Feel free to reach us.


