Are you a beginner looking for the perfect microcontroller for your programming needs? What you need is a Micro: bit Projects.
In truth, there are many things you can build with the micro: bit, enough to confuse you on where to start.
But not to worry. This article will show you 11 beginner-friendly Micro: bit projects you can add to your circuits.
Contents
What are Micro: Bits
The micro: bit is a fantastic project for anyone who wants to start programming on development boards. Plus, it’s an excellent option for children and anyone with little or no knowledge of programming languages. The best part is that you don’t have to use micro: bit accessories.
Indeed, the micro: bit by BBC first made its debut in 2016 and has become one of the best microcontrollers for beginners.
The board’s original design was for educating children between ages eight and 14. However, Micro-bit now serves as an entry point for children and beginners looking to start physical computing.
Features and Components
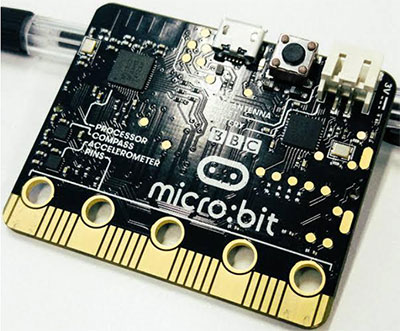
The micro: bit is a pocket-sized user-programmable computer with a 32-bit ARM Cortex-M0 processor that speeds up to 16MHz on 16 KB of RAM.
It has built-in sensors and an LED screen.
The device has connectors on the board, including five inputs and outputs (I/O). These features allow you to connect the micro: bit to other sensors or devices. Also, you can power the microcontroller with double AA batteries.
So, here are the physical components of the micro: bit development board:
- USB interface
- Connection pins
- Wireless communication (radio and Bluetooth)
- Reset button
- Twenty-five programmable LEDs
- Light and temperature sensors
- Two buttons you can easily program with A and B labels
- Motion sensors, including compasses and accelerometers
Support for Programming Languages
Micro: bit supports up to four different programming languages, including:
- MicroPython: a text-based editor that’s more popular with professional developers.
- CodeKingdoms Javascript: a graphical interface that supports drag and drops programming.
- Microsoft Touch Develop a text-based language supported by micro: bit.
- Block Editor: a block-based visual system supported by micro: bit.
So, here’s a quick tip: If you don’t have coding experience, start with the graphical options before moving to text-based options.

11 Awesome Micro: bits Projects
Here are some quick and easy fun projects you can build with your micro: bit.
1. Micro: bit Beating Heart
With this project, you can program a beating heart on the LED display of your micro: bit using animation-like loops.
Interestingly, the pulsing animations consist of two built-in pictures; one large and one small heart. These two images show a sequence that creates the illusion of a beating nature.
After the micro: bit shows one image, it waits for half a second before showing the next. Also, you can use an infinite loop to keep the movement illusion going until you pull the plug.
You can get the resources and components you need for this project here.
2. Micro: bit Animated Animals
Here’s another fun animation project you can do with a Micro: bit. You can use two images for this project: a built-in picture and a self-created one.
For instance, you can animate a duck. Then, the LED will display the built-in duck image. Next, it will show your modified duck image. Also, you can make the image by moving the pixels.
Further, the micro: bit will show the two images in half-second intervals, creating the animation of a duck bobbing up and down.
You can also use the infinite loop to keep the animation going until you power off the board.
You can get everything you need for this project here.
3. Micro: bit Step Counter
You can build a project that counts your steps and track your activity with the micro: bit.
However, this program differs from the previous projects as it uses the micro: bit accelerometer.
As a result, the micro: bit can count the frequency of shakes it experiences and store the data in variables. Additionally, computers use these variables to store dynamic information, like the number of steps.
Once the micro: bit detects a shake, it will increase the steps by one and display the new number on its LED.
Click here to get the code and other resources for this project.
4. Graphical Dice
In truth, you have two options with this project. That is, you can create dice showing numbers. Alternatively, you can create something similar to real dice with patterns.
The micro: bit accelerometer’s input allows the board to create random numbers between one to six for both options. Then, it displays it as numbers or patterns.
You can click here to get the resources for the number dice or here for the pattern dice.
5. Sunlight Sensor
Micro: bits can also work as light sensors that measure the amount of weak shining on them.
Indeed, you can also program your micro: bit to perform different actions depending on the area’s brightness. In addition, you’ll use the “if-else” statement to display an image of the sun only when the light intensity is more significant than a set level.
Hence, when you build this project, shining some light on your micro: bit should trigger a picture of the sun. And turning off the light should also remove the image.
Click here to get the full details of this light sensor project.
6. Scrolling Name Badge
Micro: bit boards are also ideal for scrolling name badges.
So, you can use the LED display on the Micro: bit to show different pictures, numbers, and words. This project allows you to create scrolling text showing your name like a badge.
Indeed, the infinite loop keeps the scroll effect going until you unplug or remove the batteries.
Click here to get the resources you need for this project.
7. Rock, Paper, Scissors
Do you love the classic “rock, paper, scissors” game? Using variables, selection, and random numbers, you can create one with the micro: bit.
Now, when you shake the Micro-bit, its accelerometer will detect the movement and set the variable to any random number between 0 and 2.
Micro-bit can decide what image to show with a specific number. For instance, If the random number is 0, the rock image will show on the LED. If iit’s1, you’ll see the Icon for the paper. If 2 is the lucky number, you’ll see the Icon for scissors.
So, you can get everything you need for this project here.
8. Micro: bit Compass
Do you want to build a compass that gives accurate directions? You can make a Micro: bit compass that shows its bearing in degrees from the magnetic north.
Micro: bit microcontrollers come with compass sensors (magnetometer). These sensors can measure the earth’s magnetic field and serve as a compass.
Thank you fully; it’s nothing complicated. But, you’ll need to perform a little calibration when using the micro: bit compass for the first time. You can tilt your micro: bit until the LED glows.
Afterward, you can press button A to activate the compass sensor and show the numerical bearing on the LED display.
Here’s everything you need for this project.
9. Thermometer
You can turn your micro: bit into a thermometer with the Bit temperature sensor.
You can check your micro: bit’s temperature by taking readings from the micro: bit CPU’s sensor. Also, it can serve as an approximation of your room temperature in degrees Celsius.
Therefore, you can press the A button to show the microcontroller’s current temperature. If you change to a warmer or colder environment, your LED display should show changes.
So, you can get all the resources you need for this project here.
10. Micro: bit Alarm Burglary System
Here’s another easy micro: bit project you can build from home. It’s an alarm burglary system that involves getting information and learning micro: bit communications.
First, you need a radio signal to interface two micros: bits. So, the first micro: bit sends notifications while the second micro: bit produces a light sensor. Then, the sensor communicates with the first micro: bit to trigger the alarm when there’s an intruder.
The tools required to run this project include:
- Batteries AA
- An alarm buzzer
- Alligator clip leads X10
- Micro: bits X2
To get more resources and detailed steps about this project, check here.
11. Sound Meter
Do you want to know how noisy your environment is? Then, you can build a micro: bit sound meter.
This project uses the micro: bit microphone sensor and a simple bar chart to show sound levels. In addition, the microphone sensor measure sounds between 0 and 225. 0 means no noise, and 225 shows a maximum noise level.
The project code also creates a forever loop that allows the micro: bit to measure sound and plot graphs to show sound levels continuously.
Click here for the necessary project resources and code.
Rounding up
Micro: bit goes beyond learning coding and programming physical computers. Also, it displays your creativity.
Different beginner projects can take you from a first-timer to a seasoned programmer. Hence, if you’re new to programming and coding microcontrollers, micro: bit is a great place to start.
Do you have any questions? Don’t hesitate to ask, and we’ll be happy to help.


