
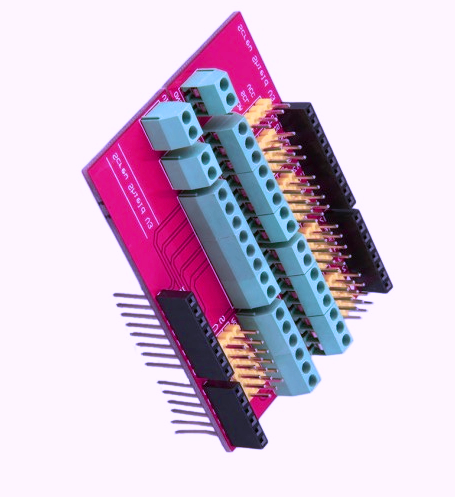
A screw shield extends and transforms the sides of Arduino and Arduino variants into screw nature terminal blocks.
Usually, the wing-like screw shield comprises 18 terminals on its pin side, where 16 are normal, and 2 are the extra GND terminals. Following are a few of the salient features of a screw shield.
Contents
1. Salient Features of a Screw Shield
1.1.A screw shield is compatible with Arduino and Arduino variants
1.2.Consists of SPI extension border
1.3.Completely stackable
2. Machines Required in the Construction of Screw Shield
2.1.Soldering Iron
2.2.Drill machine
2.3.A hacksaw
3. Components Required for Construction
3.1.An Arduino Pro Mini is the integral part required for the Screw Shield
3.2.24 Headers (Female)
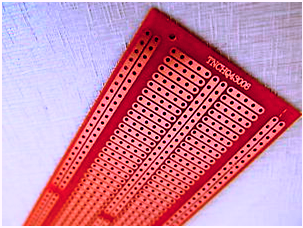
3.3.A stripe board
3.4.24 Screw Terminals with 2.54 mm pitch
3.5.Solder

4. Step Step Instructions about Making a Screw Shield
Few Points to be kept under Consideration before Making the Screw Shield
4.1.You should take a stripboard that resembles much like a breadboard having strips along one side going towards the other,
4.2.Take the pins and fuse them into the striped board with the help of copper rails plugged in from beneath,
4.3.These copper rails will help in transmitting electric current to all the components joined to the stripboard,
4.4.Now connect the connect screw terminals of 2.54 mm pitch to each pinhole without making a gap. That is a perfect setup for an Arduino Pro Mini,
4.5.Avoid connecting programming pins to anything because these will only be used for programming purposes through FTDI.

5. Making of a Screw Shield
Cut a couple of female headers and take 12 female pins for each side. Connect the 12 screw terminals and join each nail with a separate rail.
Take the female headers to the female pins on your Pro Mini so they can be easily positioned. Set these placed female headers adjacent to the screw terminals fixed on the board.
If there are any remaining screw terminals, locate them on the other side of the board. This is the final composition which now requires soldering. Let us have a deeper look at this essential step.
6. Soldering the Shield
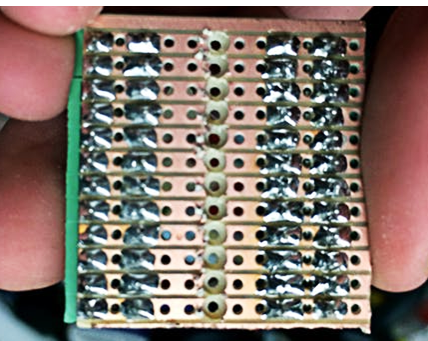
Though it seems complicated, it is a specific part of the procedure. All you have to do is just put the board upside down and start fixing the screw terminals and female pins to the board.
The natural way of fixing this is to connect the first and the last to give you a perfectly assembled and secure board.
Making the connection of bins to the board will heat up and can easily connect to the solder. Now comes the cutting and finalizing of the assembling procedure.
7. Shaping the Screw Shield
Now shape and cut the screw shield according to your requirement and keep the remaining piece for future use in any other prototyping project. You can use a hacksaw for this purpose.
| Important Tip Cutting the screw shield closer to the edges of female headers and screw terminals will be perfect. I will recommend cutting the security between columns of pinholes to avoid any damage.
|
8. Few Important Tips
Make a breaking hole between both sides of the connection to avoid mishaps. The relationship between both sides is broken with the help of a 2mm drill bit. Dig into the pinhole to secure the screw shield from any breakage in the Pro Mini board.
Remove all kinds of copper around the pinhole by drilling into each of them between each female header.
Thus drilling will distort the connection between two sides and make 24 individual connections.
Here we go; your Pro Mini screw shield is ready to use; enjoy the most secured and reliable connections with your handmade screw shield.
WellPCB
Whether you’re a starter or a seasoned guy in PCB manufacturing, PCB Manufacturing in China is a wise choice. Probably the most attractive features are that PCB Manufacturers in China can ship worldwide, with an alternative to pick a shipping agent of your preference.
Nearly all PCB Manufacturers in China will provide you with the lowest prices, even compared to your regional manufacturer. WellPCB is among the leading PCB manufacturers in China.
They can manufacture any dimension of your PCB Design in large or small-scale orders. To make an order, you’re only required to proceed to WellPCB and introduce the design of the PCB Gerber documents.
Additionally to creating custom PCBs as stated in your purchase, WellPCB will supply you with an option to permit them to do a PCB Assembly for you at an extra cost.
They also perform tests to make sure you obtain a complete product that works.


