You can Arduin turn anything into a computer these days. If you see an LED or LCD with a keypad, someone probably put a laptop inside that device. Some of these things even contain six, seven, or more small computers, called microcontrollers.
Inside them, of which the Arduino is the most popular. If you envision creating your electronic device with a built-in computer, you must understand what they are and how they function.
Only then can you go and buy a few kits from a PCB shop and start your projects.
Contents
What is Arduino?
These small microcontroller computers are usually referred to either as embedded controllers or microcontroller units (MCU). They are complete computer systems with everything you can imagine that would go into a computer. They all have a central processing unit for executing programs, temporary RAM storage, permanent storage systems, and ports for peripherals and accessories.
Microcontrollers are just individual-purpose computers built and designed to carry out only a few specific tasks. Most of the time, these devices only run a single program stored on some ROM. Though, you can attach external storage to them as well. Either way, they are considered low-power devices, and this is their charm. You can run one entirely on batteries.
An Arduino is just an open-source version of a microcontroller. It comes as a hardware development board you can use to design and build your own devices. Perfect for tinkerers, hobbyists, and makers, Arduino refers to both a specific type of board design and the company that manufactures them, and the community of developers that use them. Because of this, you can find them in nearly every electronics or PCB parts shop or catalog.
The platform comes as a physical programmable circuit board, the microcontroller itself, and the software or IDE (integrated development environment) you use to create the program the device runs. Popular among new developers, the Arduinos does not require a separate programmer device, making it much more user-friendly than other microcontroller kits on the market. It even uses a simplified version of the C++ programming language, making it easy to program.
1.1 What makes up an Arduino?
Arduinos boards come with a few components and interfaces preinstalled onto a single printed circuit board (PCB) as a microcontroller kit. These components set a standard form factor that makes the microcontroller more accessible.
The Basic Components
While the design has changed over the years, a basic Arduinos kit comes with the following components:
Pin connectors
There are two types of pins: arranged in a specific pattern, these pins let you connect the MCU to the other boards can parts of your custom device. They also allow you to attach a daughter add-on board, called a “shield,” to your device.
Digital – Single-state input/output (I/O) connectors you can set to either on or off. Most Arduinos have 14 digital pins.
Analog – Multi-state connectors that can read a range of values. You can use them for more fine-grained control. There are usually six of them.
Ground – Labeled GND, these three pins allow you to ground your device.
Power – The four 5-volt and five 3-volt pins provide power signals to add-ons and other attachments.
Pulse-width Modulation (PWM) – Eight of the digital pins double as PWM connectors. They can simulate analog output signals for such applications as dimming LEDs
Analog Reference (AREF) – Sometimes used to regulate external voltages, but these nine pins are rarely used.
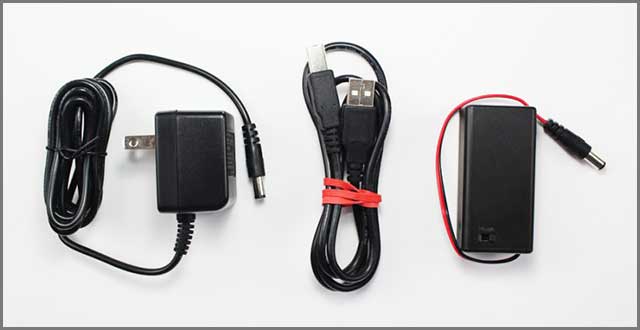
Power connector
This connector powers the device and creates low voltage power for LEDs, sensors, and others. You can use the connector with either an AC adapter or a small battery.
Main Processor
The microcontroller CPU is the heart of the platform. It allows the Arduino to execute commands and make decisions based on various inputs and running programs. The same chit will vary between the Arduinos types, but most kits supply Atmel chipsets with different onboard memory. Standard processor models include:
- ATmega8
- ATmega168
- ATmega328
- ATmega1280
- ATmega2560
Serial connector
Most Arduino boards come with a standard USB port that lets you connect the MCU to your computer to load new programs. On some boards, the USB port also doubles as a power connector.
Reset Button
Arduino boards also contain a reset button. Pressing the button triggers the reset pin. It restarts any currently running code., perfect when you want to test something but your program does not have a restart feature.
Power LED Indicator
Some Arduino MCUs come with a Power LED that indicates if the unit is on. Generally, the LED lights up when you connect the team to a power source. If this light doesn’t turn on, there’s a good chance something is wrong.
Signal Transmit and Receive LEDs
Label as TX (transmit) and RX (receive); these LEDs show serial communication activity. They provide a subtle visual clue when the unit is receiving or transmitting data.
Voltage Regulator
While not user-programmable, Arduino boards come with a voltage regulator. The regulator controls the amount of voltage going through the board. It has limits, of course, but most projects will not have voltages over 20 volts.
1.2 Arduino Add-ons and Accessories
The above components come with all Arduino MCUs, but they are not the only electronic components you can use with the platform. The boards are compliant with all IEEE and ISO standards. So, you can use any off-the-shelf parts to make your Arduino worthwhile project. However, the Arduinos platform specification does call for some platform-compliant add-ons. Because of this, most Arduinos suppliers also carry some Arduino sensors and shields. No Arduino project will be complete without them either.
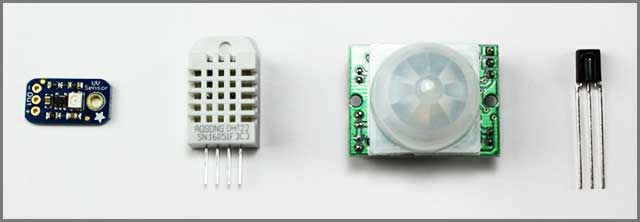
Sensors
You can use a little bit of code to have your Arduinos control and interact with a series of sensors.
Most Arduino vendors offer sensors for measuring:
- Light
- Temperature
- Degree of flex
- Pressure
- Proximity
- Acceleration
- Carbon monoxide
- Radioactivity
- Humidity
- Barometric pressure
Arduino Breadboard
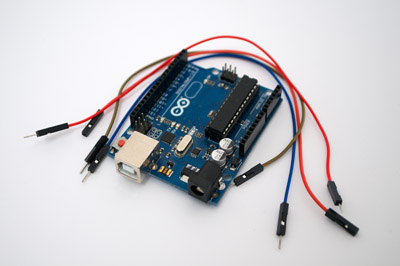
You can also get a solderless breadboard for your project. This board lets you prototype and experiment with your circuit designs and layouts without permanently soldering your components to your PCB. You can experiment and test your layout and design ideas. The breadboard does not have a power adapter. So, it would help if you used jumper wires to power it through the mainboard.
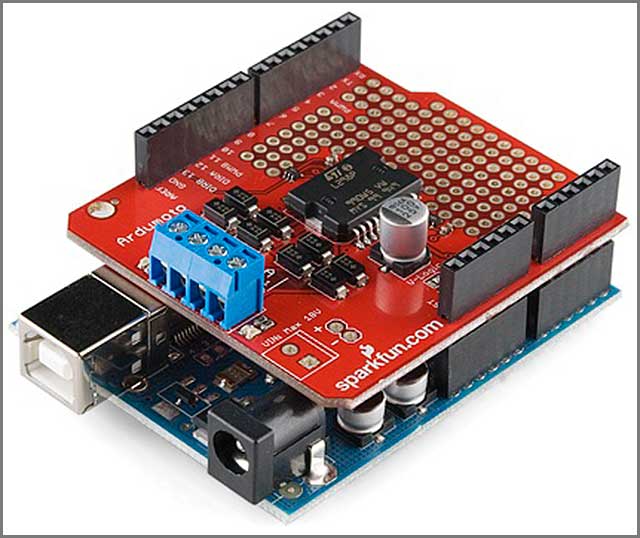
Shields
The final pieces to the Arduino puzzle are Arduino shields. These pre-built daughter boards fit on top of the main Arduino board to offer additional capabilities.
Some standard shield functions include
Controlling motors
Internet connectivity
Mobile and cellular networking and communication
LCD screen controllers
Arduino developers used the official Arduino integrated development environment (IDE) to write their Arduino programs. The open-source Java-based IDE works on all platforms running Windows, Mac, and Linux. It gives you a unique environment to write and test code written in the Processing programming language before uploading it to your device.
The Arduino Uno – The Most Popular Arduino
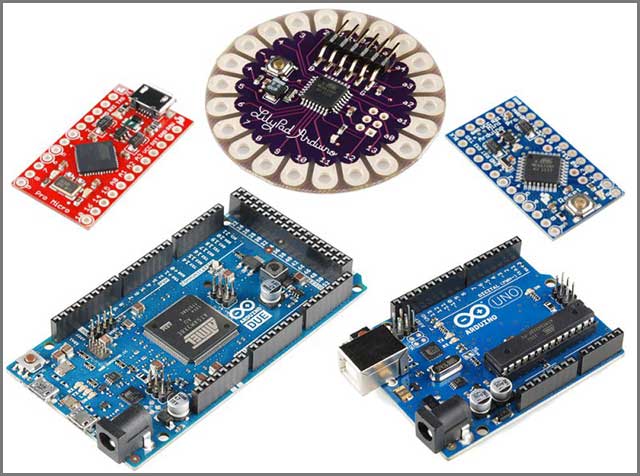
Because no two projects are alike, the Arduino group released specs for some Arduino board types. One of the most popular of these board types is the Arduino Uno.
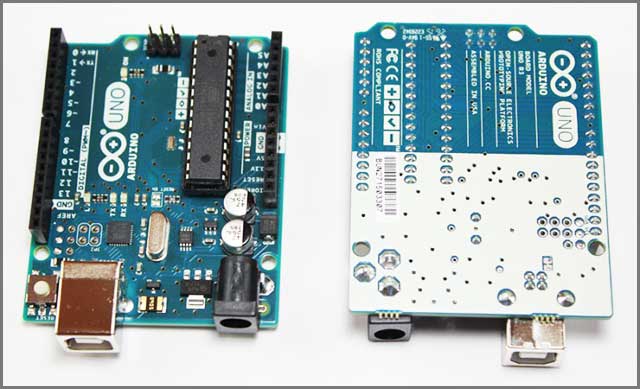
As an excellent choice for beginners, the $22 Arduino Uno MCU is a bare-bones board. It only comes with the essential components, but it allows you to design your project your way. At 25 grams, this 68.5 by 53.4-millimeter PCB is light enough to fit within an enclosure as well.
The current version, the Arduino Uno R3, comes with:
- ATmega328P Microprocessor
- 14 digital input/output pins
- 6 PWM out
- Built-in LED (connected to Pin 13)
- 5-volt, 3.3-volt, and ground pin voltage out
- Six analog pins
- USB port
- Power jack
- Reset button
- 5-volt Operating voltage
- 32 KB flash memory
- 2 KB SRAM and 1 KB EEPROM
The Uno might not be the first Arduino board, but it is the most actively used. It is also the most documented form factor with tons of project tutorials and forums throughout the Internet.
Arduino Mega – The MCU for BIG projects
Effectively four Uno MCUs in one, the Arduino Mega is the board for your massive projects. Powered by an Atmel ATmega2560 chip, the Mega brings four serial ports to the table with a separate USB port for power and interfaces with computers. It even boasts a dedicated ATmega16U2 processor just for the extra USB port. You can power the MCU with a battery as well.
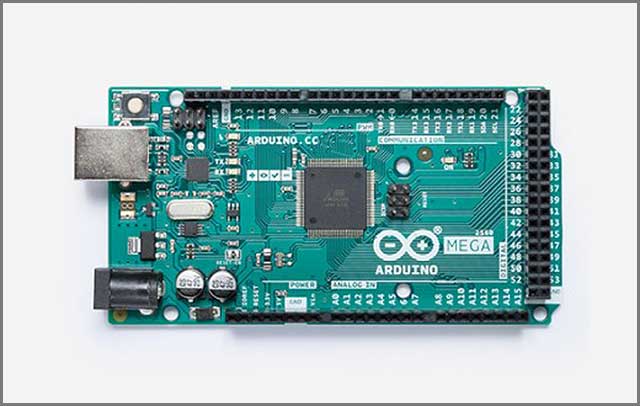
The Mega has:
- 54 Digital input/output (I/O) pins with 14 PWM-compatible ones
- 16 analog IO pins
- USB port
- Power Jack
- Reset button
The Mega’s large number of pins makes the board. You can use them in projects that require many digital I/O connections, LEDs, or buttons.
The rest of the Mega MCU’s power comes from its processor. The ATmega2560 microprocessor can do anything you can throw at it. It features a 16 MHz clocking speed, 256 KB of flash, 8 KB of SRAM, and 4 KB of EEPROM. All this makes the Arduino Mega the go-to board for 3D printers and robotics.

Arduino ESP8266 Makes Your Projects Wireless
No Arduino board comes with wireless networking on the board itself. You will not find it on any of the available shields as well. You need an Arduino ESP8266 Wi-Fi Module if you want to make your project wireless.
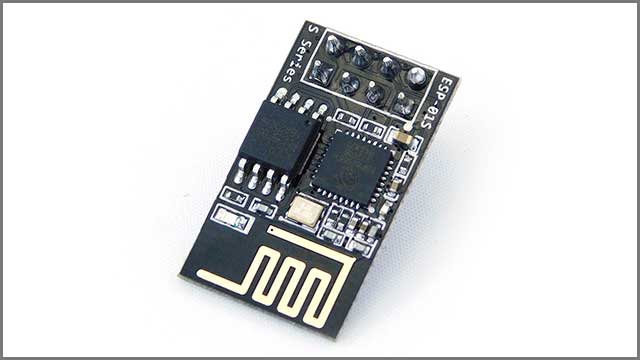
While there are newer modules out there, the ESP2866 is the original. It might not be designed to work as a standalone MCU, but your project needs one in today’s mobile market.
It does offer some decent wireless connectivity, though. The board comes with power, ground, transmit and receive pins to connect these features to your central Arduino, as well as an on-off, “chip-controlled power down” (CH_PD) pin. You also have a reset and two GPIO data pins.
There is one downside. The ESP8266 requires a 5-volt power signal. It will not work with the Arduino standard 3.5 volts.
PWM Subsystem and Framework
5.1 Arduino PWM
Pulse-Width Modulation (PWM) simulates an analog signal using square wave signals with varying frequencies and amplitudes. The Arduino platform uses these signals to regulate analog circuits with its digital outputs.
The Arduino PWM platform is not a separate piece of hardware. All Arduino boards come with the system calls built-in. You need to write a program that uses them. The command creates the square wave through a compatible pin.
5.2 Arduino Nano – Perfect for Small Devices and Projects
As the most miniature version of the Arduino platform, the Arduino Nano offers the same features as the Uno in a much smaller package powered by an ATmega328P processor and an Atmega168 coprocessor. It uses the same Arduino IDE software as the other Arduino boards as well.
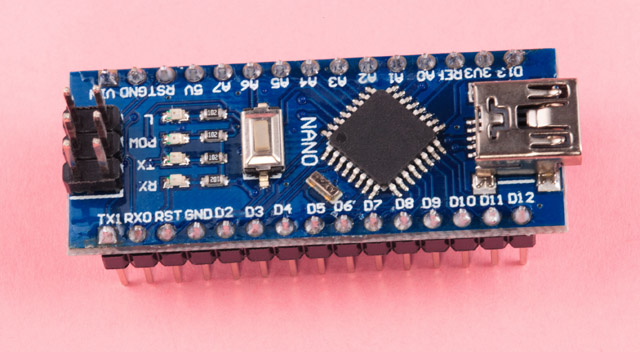
The Nano comes with:
- 14 digital I/O pins with 6 PWN-compatible pins
- Eight analog pins
- 5-volt operating voltage
- Reset button
- USB port
- Serial port
- 32kb flash memory
- 8 kb SRAM
- 1 kb EEPROM
Despite its size, the Nano works excellent with the following project types:
- Embedded Systems
- Automation
- Robotics
- Control Systems
- Instrumentation
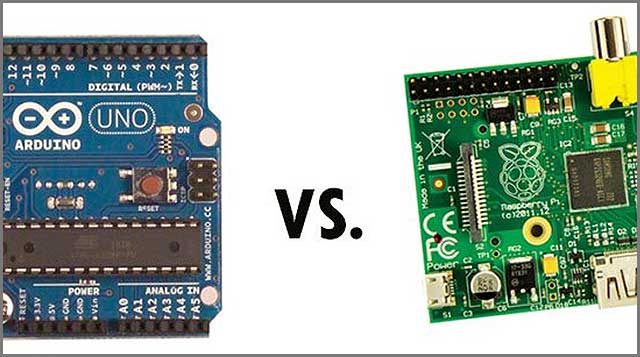
Why Choose an Arduino over a Raspberry Pi?
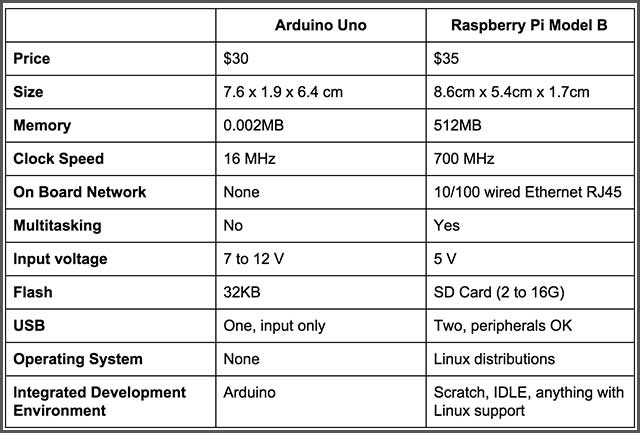
The Arduino platform is not the only MCU on the market. Many of the other MCUs offer the same features are the Arduino, including the Raspberry Pi. However, the PI is a very different product than the Arduino.
For one, the Raspberry PI is an entire computer. The Arduino is not. A microcomputer is just one small component that makes up a computer. Because of this, the Arduino platform only provides a small subset of what the PI has to offer. For instance, it can just run small applications and not a full-blown computer operating system.
6.1 Strengths and Weaknesses of the
That does not mean the Arduino is useless. It is perfect for electronics projects that do not need an entire computer to function. You can connect it directly to your components and sensors and have everything work out of the box with little or no setup.
The Arduino can do this because of how the Arduino firmware works. The firmware is the core software that runs the Arduino line of boards. It also communicates with your computer over USB to give you access to all of its programmable features. While you can always replace the firmware, you will never have to do it. You do not even need to reboot it. Once you upload your code, you can run it anywhere immediately. There is no need for a keyboard, display, or a means to choose an application. The board will do the one job you give it.
6.2 The Raspberry Pi is a Full Computer
In contrast, the Raspberry Pi is a fully functional computer. It needs an operating system to run, which requires rebooting to stay operational. The board has no internal storage either. It would help if you supplied external micro-SD care to store the programs you want to run. Though it does have built-in Ethernet, you can update the software without having to remove the card.
The Pi runs on a Broadcom Arm-v6 CPU complete with memory and an HDMI graphics processor. The board also works great with a keyboard and mouse, allowing you to load up a Linux variant, and have it so that no one can tell that you used such a tiny machine to drive everything. That is how powerful it is. It is the perfect platform for projects that require full user interactivity and all that processing power.
However, this power makes the Pi ill-suited for smaller projects. For example, you need to plug an LED onto an Arduino board to light it up with only eight lines of code. The Pi will require extra libraries in addition to your code just to get started, and that is if you already have an operating system already installed on the board.
That does not mean you cannot use the Raspberry Pi and the Arduino for the same types of projects. You can install framework libraries that will give the Pi the same features as the Arduino. It just takes a lot more time and effort to use a Pi in a project.
The Arduino also has a larger community of developers. As the most popular platform for electronics projects, the Arduino has many tutorials for beginners to help you get started.
Regardless, you never have to choose between these two boards. They work great together. With the proper attachment, your Arduino can become a daughter extension board for your Raspberry Pi, giving both cards access to each other’s functions.
Conclusion
The Arduino is a family of microcontroller platforms design specifically for Do-it-yourself electronics projects. These single-use boards come with everything you need to automate your task and then some. You have to plug it into your computer, create some code, and just run it. It will do the rest.
To get one or any other component for your projects, contact us immediately. Out representatives understand Arduino and are ready to help you decide which board and add-ons are right for you. We can even help you get the parts you need to hook your Arduino up to a Raspberry Pi to bring your devices to the next level.


